This article contains affiliate links. We may earn a small commission if you purchase through these links, at no extra cost to you.
A Saturday morning. Me sitting at the kitchen table of our temporary rental with a legal pad, a calculator, and about fourteen browser tabs open. Trying to figure out how many solar panels our off-grid cabin was going to need.
Every website gave me a different answer. Solar company sites said I needed a 10 kW system — conveniently the most expensive option they sold. Reddit said I could get by with 2 kW and “just use less electricity.” YouTube preppers were running their entire homesteads off a single 200-watt panel and a car battery, which seemed either genius or a fire hazard. Probably the second one.
I called my buddy Frank, who’d been off-grid in Vermont for six years. He laughed and said “Those YouTube guys are either lying or they don’t use electricity.” Then he spent forty-five minutes walking me through the actual math.
That conversation saved me thousands of dollars and months of frustration. Here’s everything Frank taught me, plus what I’ve learned running our own system for four years.
Start With Your Load, Not Your Panels
Everybody starts by shopping for solar panels. Wrong approach. You start by figuring out exactly how much electricity you need. Then you size everything else to match.
Get a piece of paper. List every electrical device you’re going to use. Not “might use someday” — actually USE, daily or weekly. For each one, write down its wattage and how many hours per day you’ll run it.
Here’s our actual list:
| Device | Watts | Hours/Day | Wh/Day |
|---|---|---|---|
| LED lights (6 fixtures) | 60 total | 5 | 300 |
| Refrigerator | 65 avg | 24 | 1,560 |
| Chest freezer | 45 avg | 24 | 1,080 |
| Laptop | 45 | 6 | 270 |
| Phone charging (2) | 15 | 3 | 45 |
| Coffee grinder | 200 | 0.03 | 6 |
| Washing machine | 500 | 0.75 (3x/week avg) | 375 |
| Water pump | 150 | 1 | 150 |
| Starlink | 75 | 24 | 1,800 |
| Miscellaneous | 100 | 2 | 200 |
Daily total: approximately 5,800 Wh, or 5.8 kWh.
Round up for inefficiency losses — charge controllers, inverters, and wiring all lose some power as heat. Add twenty percent. That gives us about 7 kWh per day as our real-world target.
The Starlink dish surprised me. Seventy-five watts continuous, twenty-four hours a day. That’s 1.8 kWh — nearly a third of our total consumption just for internet. If you’re sizing a system and planning on Starlink, account for it early. It’s not a small load.
What we DON’T run on solar: electric stove (we use propane), electric heater (wood stove), electric dryer (clothesline), air conditioning (we don’t have or need it), hair dryer (my wife air-dries now and has opinions about this), microwave (propane stove works for reheating). Every one of those devices would double or triple our system cost.
That’s the first and most important decision in off-grid solar: what you choose NOT to power electrically. Running a few high-draw appliances on propane cuts your solar investment in half.
Eliminate High-Draw Appliances Before Sizing Your System
Electric stoves, dryers, water heaters, and air conditioning are the four biggest electricity consumers in a typical household. Switching each of these to propane, wood, clothesline, or passive cooling before calculating your solar needs can cut your required system size — and cost — in half. Size your solar system around what remains.
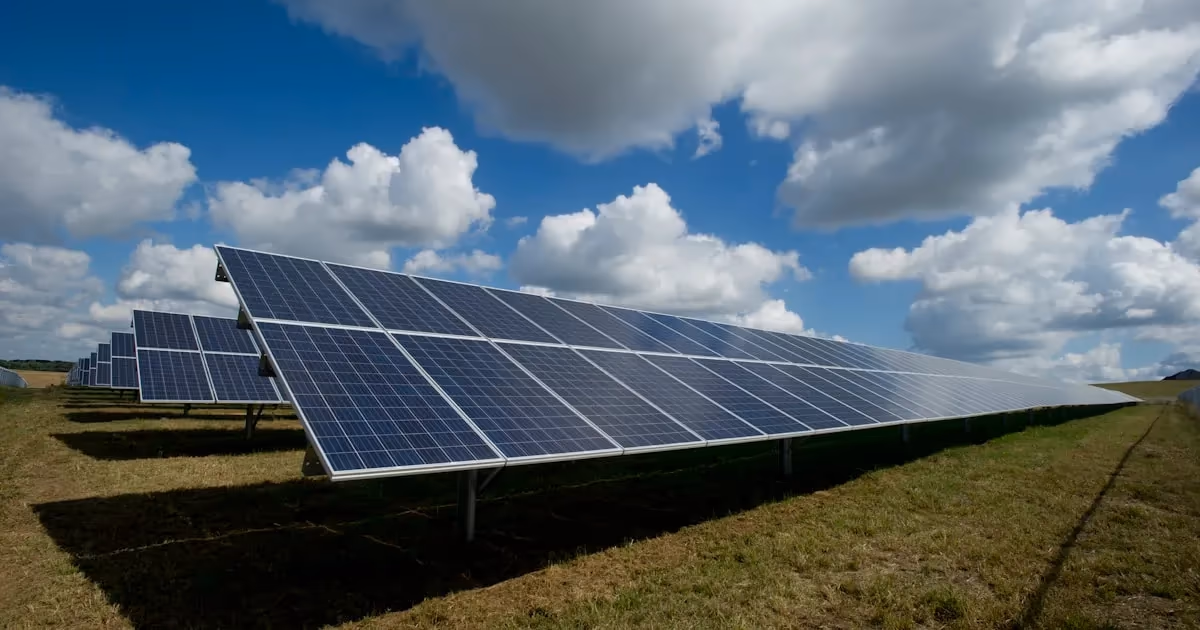
Sizing the Solar Array
Now you know your daily need: 7 kWh. Next question: how much sun do you get?
“Sun hours” doesn’t mean hours of daylight. It means “peak sun hours” — the equivalent number of hours at 1,000 watts per square meter. In Tennessee where we are, that’s about 4.5-5 hours per day average across the year. In winter, it drops to 3-3.5 hours. In summer, it’s 5.5-6.
Always size for winter. Your system needs to work when the sun is weakest, the days are shortest, and the clouds are thickest. If you size for summer, you’ll have excess power in July and not enough in January.
The formula is simple:
Daily energy need ÷ winter sun hours = minimum array size
7,000 Wh ÷ 3.5 hours = 2,000 watts minimum
But that’s the theoretical minimum with zero losses, perfect conditions, and panels that never get dusty or shaded. Real world: add thirty to forty percent.
2,000 W × 1.35 = 2,700 watts
Our choice was 3,600 watts (twelve 300-watt panels) because panels are the cheapest part of the system and more capacity means more buffer for cloudy stretches. I’d rather have too many panels than too few. Extra solar production just gets wasted — the charge controller throttles it when the batteries are full. No harm done. But underproduction means running the generator, which costs fuel and makes noise.
Size Your Solar Array for Your Worst Winter Month
Peak sun hours in winter can be half what they are in summer. A system sized for July production will leave you running your generator every other week in January. Look up the NREL solar resource data for your location and use the lowest monthly peak sun hours figure — not the annual average — to calculate your minimum array size.
Where you put the panels matters almost as much as how many you have. South-facing, angle equal to your latitude for year-round production, or steeper (latitude plus 15 degrees) if you’re optimizing for winter. Ours are on the cabin roof at about 50 degrees. No shade from 9 AM to 3 PM — that’s the critical window. Even partial shade on one panel drags down the whole string if you’re using a string inverter. MPPT charge controllers with panel-level optimization help with this, but avoiding shade is better than engineering around it.
The Battery Bank: Where the Real Money Goes
Panels make power. Batteries store it. You need enough storage to get through the night and through cloudy days.
A rough minimum for storage: two to three days of autonomy. That means your battery bank should store enough energy to run your house for two to three days with zero solar input. For our 7 kWh daily need, that’s 14-21 kWh of usable storage.
Key word: USABLE. Lead-acid batteries should only be discharged to fifty percent to preserve their lifespan. So if you need 14 kWh of usable storage from lead-acid, you need 28 kWh of total capacity. Lithium batteries can be discharged to eighty to ninety percent, so 14 kWh usable means roughly 16-17 kWh total.
This is why lithium wins despite the higher upfront cost.
Our bank is a 48V lithium iron phosphate (LiFePO4) setup, 15.36 kWh total capacity, roughly 13-14 kWh usable. That gives us two days of autonomy, which combined with a backup generator is plenty.
LiFePO4 is the standard for off-grid solar storage. It’s the safest lithium chemistry — no thermal runaway risk, no fire danger under normal conditions. It handles 3,000-5,000 charge cycles before degrading to eighty percent capacity. At one cycle per day, that’s eight to fourteen YEARS. Compare that to lead-acid batteries lasting three to five years and the economics are clear.
Our 15 kWh LiFePO4 battery bank cost about $5,500 in 2022. Prices have dropped since. A comparable lead-acid bank would have cost about $2,000 but would need replacement in four years. Do the math over ten years and lithium costs less.
One thing I underestimated at first: temperature sensitivity. Lithium batteries don’t like extreme cold. Below 32 degrees F, charging efficiency drops. Below zero, you can damage them by charging. Our batteries are inside the cabin in the utility room where they stay above 50 degrees year-round. If your batteries will be in an unheated shed or garage, you need either battery heaters or a well-insulated enclosure.
Never Charge Lithium Batteries Below Freezing
Charging a lithium iron phosphate (LiFePO4) battery below 32°F (0°C) causes lithium plating inside the cells — permanent, irreversible damage that reduces capacity and can eventually cause a short circuit. If your battery location gets below freezing in winter, install battery heater pads ($30-$80) with a thermostat, or move the battery bank to a heated space.
The Charge Controller
This is the brain between your panels and your batteries. It regulates voltage and current to charge the batteries safely and efficiently.
Get MPPT — not PWM. PWM charge controllers are cheaper but waste fifteen to thirty percent of your solar production. MPPT controllers convert excess voltage into usable current, squeezing every available watt from your panels. For a system our size, the efficiency difference pays for the controller upgrade in the first year.
Our controller is a Victron SmartSolar MPPT 150/100. It handles up to 5,800 watts of solar input and 100 amps of charge current. Has Bluetooth monitoring so I can check system status from my phone. Victron also makes the inverter and battery monitor in our system — keeping everything in one ecosystem makes troubleshooting much easier.
For sizing, your charge controller needs to handle the maximum current your panels can produce. Add up the short-circuit current (Isc) of all your panels in each parallel string. That number needs to be below the controller’s rated current. If you’re not comfortable with this math, the panel manufacturer’s spec sheets have everything you need, and Victron’s online sizing tool will walk you through it.
The Inverter
Converts DC battery power to AC household power. You need a pure sine wave inverter — not “modified sine wave.” Modified sine wave inverters are cheaper but they cause problems with sensitive electronics, make LED lights flicker, and make motors in washing machines and fridges run hot. Pure sine wave only.
Your inverter needs to handle your peak load — the maximum wattage you’ll ever draw at one time. Add up the wattage of everything that might run simultaneously. For us, worst case: water pump (150W) + washing machine (500W) + refrigerator compressor kicking on (200W surge) + lights (60W) + laptop (45W) + Starlink (75W) = about 1,030 watts continuous. Sounds manageable.
BUT. Motors have startup surges. A refrigerator compressor pulls three to five times its running wattage for a split second when it starts. A washing machine surges during spin cycle. These transient loads can trip a too-small inverter.
Our inverter is rated 5,000 watts continuous, 10,000 watts surge. Way more than we need day to day, but it handles every startup surge without blinking. Oversizing the inverter a bit is cheap insurance.
We use a Victron MultiPlus-II 48/5000. It also doubles as a battery charger when we run the generator, so we don’t need a separate charger. One less component to buy and one less thing to break.
A Combined Inverter-Charger Simplifies Your System
A hybrid inverter/charger like the Victron MultiPlus converts DC battery power to AC for household use AND charges your batteries from a generator — in one unit. This eliminates a separate battery charger, reduces wiring complexity, and gives you seamless generator integration. Worth the extra $200-$400 over a standalone inverter for any system using a backup generator.
The Generator Backup
You need one. I know — the whole point of solar is not burning fossil fuels. But reality is that every off-grid system has cloudy weeks in winter where the batteries drain down to nothing and the sun won’t cooperate. A generator runs for a few hours, tops off the batteries, and keeps you going.
Our backup is a Champion 3,500-watt dual-fuel generator. Runs on propane or gasoline. We keep three twenty-pound propane tanks filled. Running the generator on propane at half load for four hours charges our batteries from twenty percent to eighty percent and costs about four bucks in propane.
We run it maybe fifteen times per year. Usually January and February during extended overcast stretches. Every other month, solar handles everything without help.
Tip from Frank that saved me a headache: run the generator once a month even if you don’t need to. Just ten minutes under load. It keeps the carburetor from gumming up. A generator that won’t start when you actually need it is worse than no generator at all.
What I’d Do Differently
After four years of living with this system, here’s what I’d change:
I’d add more panels — go from 3.6 kW to 5 kW. Panels are the cheapest component per watt and extra capacity means the generator runs less in winter. Two more panels would have cost $400 and probably cut our generator usage in half.
Better monitoring earlier. I added a Victron Cerbo GX monitoring hub in year two. Should have installed it day one. Being able to see real-time solar production, battery state, and consumption patterns on my phone changed how I managed the system. I noticed our freezer was consuming more than expected, adjusted the thermostat, and saved nearly a kWh per day. Couldn’t have found that without monitoring.
DC appliances where possible. Our water pump is AC, which means the power goes from panels to batteries (DC), through the inverter (converted to AC), to the pump. Each conversion loses efficiency. A DC water pump would skip the inverter step entirely. Same logic applies to DC LED lighting and DC refrigerators, though DC fridges are more expensive upfront.
The Real Cost Per Watt
People throw around “cost per watt” numbers without specifying what they include. So here’s ours, all-in:
- Panels: $2,400 (twelve 300W panels at $200 each)
- Charge controller: $900
- Battery bank: $5,500
- Inverter: $2,100
- Wiring, breakers, combiner box, transfer switch: $800
- Mounting hardware: $500
- Generator: $800
Total: $13,000 for a 3.6 kW system with 15 kWh storage.
That’s about $3.61 per watt all-in. Commercial solar installers doing grid-tied systems charge $2.50-3.50 per watt but that doesn’t include batteries or any off-grid components. Our number is apples-to-oranges different from a grid-tied quote.
Over ten years with no electric bill, the system saves us roughly $18,000 compared to what we’d pay for grid power (assuming $150/month, which is conservative for Tennessee). The system pays for itself in about seven years and generates free electricity for another eight to ten years after that.
If self-sufficiency and emergency preparedness matter to you — and you’re reading this, so they probably do — there is no better investment than owning your own power production. Grid goes down? You don’t notice. Electric rates go up? You don’t care. That peace of mind is worth the upfront cost, at least to us.
For general off-grid planning beyond just solar, check out the complete guide to off-grid living which covers water, waste, heating, and everything else you’ll need to figure out.
Start with the load calculation. Be honest about what you need. Size for winter. Buy lithium batteries. And get a generator for backup, because pride doesn’t keep the lights on during a week of clouds.