Affiliate links below. If you buy something through these links, I earn a small commission at no extra cost to you. Only gear I actually own or have used extensively.
The $300 Mistake That Taught Me Everything
My backyard in Riverview, Florida. I’d just bought a cheap offset smoker from a guy on Facebook Marketplace — $80, rusted around the firebox, but I figured smoke is smoke. My buddy Travis came over with a 14-pound brisket he’d picked up at Costco for about $55, and we were going to smoke it “low and slow” because that’s what the YouTube videos said.
We loaded the firebox with charcoal and hickory. Didn’t have a thermometer. The one built into the lid was broken and we figured we’d just feel the heat. That’s not a joke — two grown men standing around a metal box going “yeah that feels about 250” like we were human thermocouples.
Eight hours later we pulled that brisket off. It looked beautiful on the outside. Dark bark, nice smoke ring. We let it rest for maybe ten minutes because we were starving. Cut into it and — rubber. Absolute shoe leather. Dry, tough, inedible. Even the dog chewed it for a minute and walked away. Sixty-something dollars in meat and a full day wasted because we didn’t know what we were doing.
I’ve smoked hundreds of cuts since then. Brisket, pork butt, ribs, chicken, jerky, salmon, cheese, even salt. My smokehouse out back runs year-round now and a solid third of the protein my family eats comes out of it. If you’re already canning and preserving food — and you should be — smoking is the natural next step in building a pantry that doesn’t depend on a grocery store staying open.
Here’s what I wish someone had told me before I turned that brisket into a hockey puck.
Smoker Types: Honest Opinions
There are four smoker types worth discussing. Everything else is a variation on these.
Offset Smokers
Classic setup. A horizontal cooking chamber with a firebox attached to the side. Heat and smoke flow from the firebox through the cooking chamber and out the chimney. This is what most people picture when they think of smoking meat.
Real talk: Offset smokers produce incredible results but they’re the hardest to learn on. Temperature management is entirely manual. You’re feeding the firebox every 30-45 minutes, adjusting vents, fighting wind, and babysitting for 12-16 hours on a brisket cook. A quality offset — something like an Oklahoma Joe’s Highland ($350-$400) — is a solid entry point. Don’t go cheaper than that. The $150 offset smokers leak air like a screen door and you’ll fight temperature swings all day.
I use an offset as my primary smoker now. But I wouldn’t recommend it for your first smoker.
Pellet Smokers
These use compressed wood pellets fed by an electric auger into a fire pot. A digital controller maintains temperature automatically. You set it to 225°F, walk away, and come back when it’s done.
Straight up: Pellet smokers are the easiest to use by a mile. The Traeger Pro 575 ($700-$800) and the Camp Chef SmokePro DLX ($400-$500) are both solid. The trade-off is they produce a lighter smoke flavor than stick burners. Some BBQ purists say pellet smokers aren’t “real” smoking. Those people can eat their opinions — the meat comes out great and you don’t have to stand outside for 14 hours in January.
One catch: they need electricity. If you’re thinking about smoking meat in an off-grid or survival food storage situation, pellet smokers aren’t the answer.
Vertical Water Smokers (Bullet Smokers)
A vertical cylinder with a charcoal pan on the bottom, a water pan in the middle, and cooking grates above. The Weber Smokey Mountain 18” ($350-$400) is the gold standard here and has been for decades.
My honest take: Start here. This is the smoker I recommend for beginners. Set up the charcoal using the Minion Method (I’ll explain below), fill the water pan, put your meat on, adjust the vents, and check it every hour or two. The water pan stabilizes temperature beautifully. The Weber Smokey Mountain can hold 225°F for 8-10 hours without intervention once you get the vents dialed in. It’s compact, affordable, and produces competition-quality results.
Best First Smoker for Beginners
Start with a Weber Smokey Mountain 18” ($350-$400) rather than an offset smoker. The water pan naturally stabilizes temperature, which eliminates the hardest part of learning to smoke. Offset smokers produce great results but require constant attention during your first year — save that for when you understand how heat and airflow interact.
Ugly Drum Smokers (UDS)
Picture a 55-gallon steel drum converted into a smoker. Charcoal basket on the bottom, cooking grate near the top, intake vents drilled in the side. You can build one for $50-$100 or buy a pre-made one like the Gateway Drum Smoker ($400-$500).
No kidding: UDS smokers are almost stupidly simple and they work phenomenally well. The thermal mass of that thick steel drum holds temperature like a champ. If you’re handy and like projects, building a UDS is a great weekend build. You need an unlined 55-gallon drum (make sure it never held chemicals), a charcoal basket, some intake pipe fittings, and a cooking grate. Total cost: about $75 in materials if you source the drum cheap.
Wood Selection: This Actually Matters
Wood choice is the seasoning. Different woods produce different flavors, and pairing the right wood with the right meat is the difference between “that’s pretty good” and “that’s the best thing I’ve ever eaten.”
The Pairings That Work
| Wood | Flavor | Best With |
|---|---|---|
| Hickory | Strong, bacon-like, smoky | Pork, ribs, brisket |
| Oak | Medium, clean, versatile | Brisket, beef, sausage |
| Cherry | Mild, sweet, fruity | Pork, poultry, game birds |
| Apple | Mild, sweet, subtle | Poultry, pork, fish |
| Mesquite | Very strong, earthy, intense | Short cooks only — beef fajitas, burgers |
| Pecan | Medium, nutty, slightly sweet | Pork, poultry, everything really |
| Maple | Mild, sweet, delicate | Poultry, vegetables, cheese |
My strong opinion: Start with oak or cherry. They’re forgiving. Hickory is classic but it’s easy to over-smoke with — too much hickory makes everything taste like an ashtray. And mesquite should only be used for short cooks under 2 hours. I’ve seen people try to smoke a brisket for 14 hours over mesquite and the result tasted like they’d seasoned it with creosote.
Never use: pine, cedar (except planking salmon), treated lumber, plywood, anything with paint or stain. Softwoods and treated wood release toxic compounds when burned. This isn’t a taste preference — it’s a health hazard.
Never Burn Softwoods, Treated Lumber, or Unknown Wood
Pine, cedar, and other softwoods release creosote and toxic resins when burned that deposit on the meat and can cause illness. Treated lumber, plywood, and painted wood release carcinogenic compounds. Only use labeled hardwood chunks from a known supplier, or wood you have personally identified as an untreated hardwood species.
Buy wood chunks, not chips. Chips burn too fast and you’re constantly adding more. Chunks ($15-$20 for a bag) smolder slowly and produce consistent smoke for hours. For pellet smokers, Lumberjack pellets ($15-$20 per 20-pound bag) are 100% hardwood with no fillers — a lot of pellet brands mix in oak filler and just flavor the outside.
Temperature Control: The Skill That Separates Good From Great
What ruined my first brisket? I didn’t know the temperature. And when you don’t know the temperature, you’re guessing. Guessing produces shoe leather.
You need two thermometers. Not one. Two.
A pit thermometer that measures the air temperature inside the cooking chamber. The thermometers built into smoker lids are garbage. They’re mounted at the top of the lid, far from the meat, and they’re usually off by 30-50 degrees. Get a ThermoPro TP20 ($55) or similar wireless thermometer that has a probe for the pit and a probe for the meat. You clip one probe to the grate near the meat and the other goes into the thickest part of whatever you’re cooking.
A Dual-Probe Wireless Thermometer Is Non-Negotiable
The built-in lid thermometer on most smokers reads 30-50°F hotter than the actual temperature at grate level where your meat sits. A dual-probe wireless thermometer like the ThermoPro TP20 ($55) gives you both pit temperature and internal meat temperature simultaneously — it is the single most important piece of equipment after the smoker itself.
Target pit temperatures:
- Low and slow (brisket, pork butt, ribs): 225-250°F
- Poultry: 275-325°F (chicken skin doesn’t render well below 275)
- Jerky: 160-180°F
- Cold smoking (cheese, salt, fish): Below 90°F
The Minion Method
For charcoal smokers, this changed everything for me. Fill your charcoal basket or chamber with unlit briquettes. Light about 15-20 briquettes in a chimney starter until they’re fully ashed over. Dump those lit coals on top of the unlit pile. Add a few wood chunks on top.
Lit coals slowly ignite the unlit ones beneath them, producing consistent heat for 6-12 hours depending on your smoker size. No more feeding charcoal every hour. No more temperature roller coasters. It’s a set-and-mostly-forget approach that works beautifully in bullet smokers and UDS setups.
Vent Management
Bottom vents control how much oxygen reaches the fire — more open means hotter. Top vents (exhaust) should stay mostly open; you want smoke flowing through, not stagnating. Stale smoke trapped inside the chamber makes meat taste bitter and acrid.
Golden rule: Control temperature with the bottom vent. Leave the top vent at least 75% open. If your smoke is white and billowing, you’ve got too much fuel or not enough airflow. You want thin, blue smoke — almost invisible. That’s clean combustion and it’s what gives meat that perfect smoky flavor.
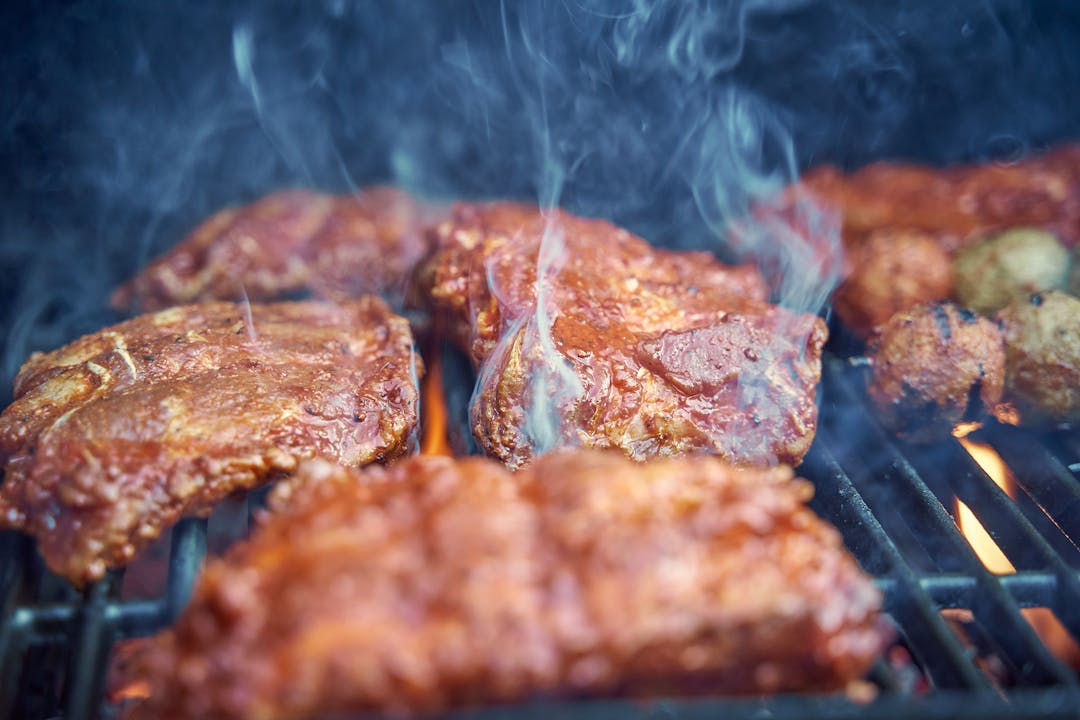
Three Recipes to Start With
Pork Butt (Pulled Pork) — The Best Beginner Cook
Every new smoker should start right here. Pork butt is cheap ($1.50-$2.50/lb), forgiving, and almost impossible to screw up.
What you need: A 7-9 pound bone-in pork butt. Yellow mustard. A rub — equal parts brown sugar, paprika, garlic powder, onion powder, black pepper, and salt, with a pinch of cayenne.
- Slather the pork butt with yellow mustard (it’s just a binder, you won’t taste it)
- Apply the rub generously — really pack it on
- Smoker at 225-250°F with cherry or hickory
- Cook until internal temperature hits 195-203°F — this takes 10-14 hours for a 8-pounder
- You’ll hit “the stall” around 160°F where the temperature stops climbing for hours. Don’t panic. The meat is sweating and the evaporation cools it. Wait it out or wrap in butcher paper (the “Texas crutch”) to push through
- Rest for at least 1 hour in a cooler wrapped in towels
- Pull with forks or bear claws ($12)
Internal temp of 195-203°F is where collagen breaks down into gelatin, making the meat tender enough to pull apart. Below 190°F and it’ll be tough. This is a fact of biology, not a suggestion.
Beef Brisket — The Challenge
Don’t start here. I’m serious. Smoke three or four pork butts first. Brisket is expensive and unforgiving.
Shopping list: A whole packer brisket, 12-15 pounds. Expect to pay $4-$6/lb — so $50-$90. Keep the rub simple: coarse black pepper and kosher salt, 50/50. That’s it. This is the Central Texas way and it works.
- Trim the fat cap to about 1/4 inch thick — not bald, not shaggy
- Apply the salt and pepper rub
- Smoker at 225-250°F with oak or a mix of oak and hickory
- Fat side up or down — opinions vary. I go fat side up on offset smokers (heat from below) and fat side down on bullet smokers (heat from below and the fat protects the meat)
- Cook until 195-205°F internal in the thickest part of the flat. This takes 12-18 hours
- The stall will happen around 150-165°F. Wrap in pink butcher paper if you want to push through
- Rest in a cooler for 2-4 hours. This isn’t optional. Resting lets the juices redistribute
- Slice against the grain, about pencil-thickness
If you’re processing game from a hunt — venison, elk, wild boar — the same brisket technique applies to tougher cuts, but drop the temperature to 215-225°F and expect longer cook times. Wild game has less fat and dries out faster.
Beef Jerky — Smoking for Preservation
Now we’re crossing from “weekend hobby” into genuine food preservation. Properly smoked and dried jerky lasts months without refrigeration and it’s one of the best shelf-stable proteins you can store.
Grab: 3-5 pounds of lean beef — top round, bottom round, or eye of round. $4-$6/lb. Slice it 1/4 inch thick against the grain. A sharp knife or — much easier — ask the butcher to slice it for you, or partially freeze it and use a meat slicer ($50-$150).
Marinade: Soy sauce, Worcestershire, black pepper, garlic powder, onion powder, red pepper flakes, a tablespoon of brown sugar. Marinate in a zip-lock bag for 12-24 hours in the fridge.
- Pat strips dry with paper towels
- Lay strips directly on smoker grates — don’t overlap
- Smoker at 160-180°F with hickory or mesquite
- Smoke for 4-6 hours until strips crack when bent but don’t break
- The USDA says ground meat jerky needs to hit 160°F internal. Whole-muscle jerky should also reach 160°F to be safe for long-term storage
Done right, vacuum-sealed jerky stores for 6+ months at room temperature. In a sealed mason jar with an oxygen absorber, even longer. I’ve eaten jerky a year after making it with zero issues.
Hot Smoking vs. Cold Smoking
Everything I’ve described so far is hot smoking — cooking and smoking simultaneously at temperatures above 126°F. The meat is fully cooked when it comes off.
Cold smoking is different. The food is exposed to smoke at temperatures below 90°F, ideally 68-86°F. The food is NOT being cooked — just flavored and, in some cases, preserved. Cold-smoked items include:
- Bacon (cold smoked then cooked before eating)
- Salmon/lox
- Cheese
- Salt
- Sausages (some styles)
Cold smoking requires a separate smoke generator that pipes smoke into the chamber without heat. A Smoke Daddy cold smoke generator ($60-$100) or an A-MAZE-N pellet tube smoker ($15-$25) works well for this.
Warning on cold smoking: Because the food stays in the “danger zone” (40-140°F) for extended periods, cold smoking carries real food safety risk if you don’t know what you’re doing. Meats must be properly cured with sodium nitrite (pink curing salt #1) before cold smoking. This inhibits botulism and other bacterial growth. Don’t skip the cure. Cheese and salt are safe to cold smoke without curing because bacteria isn’t an issue with those items.
Cold Smoking Meat Requires Proper Curing First
Cold smoking keeps meat in the bacterial danger zone (40-140°F) for hours. Without proper curing with sodium nitrite (pink curing salt #1), this creates ideal conditions for botulism — an odorless, tasteless, and potentially fatal toxin. Never cold smoke meats (bacon, sausage, salmon) without following a tested cure recipe first. Cheese and salt require no curing and are safe to cold smoke without it.
Cold-smoked cheese is absurdly good, by the way. Smoke a block of sharp cheddar for 2 hours at 75°F, vacuum seal it, and let it sit in the fridge for two weeks. The smoke flavor mellows and permeates the entire block. Slice it thin. You’ll never buy smoked cheese from the store again.
Food Safety Temperatures — Non-Negotiable
| Meat | Minimum Internal Temp |
|---|---|
| Beef, pork, lamb (whole cuts) | 145°F + 3 min rest |
| Ground meat (beef, pork) | 160°F |
| All poultry (whole, ground, pieces) | 165°F |
| Jerky (whole muscle) | 160°F |
| Jerky (ground meat) | 160°F |
| Fish | 145°F |
These aren’t suggestions. These are the temperatures at which harmful bacteria are killed. When you’re smoking at low temperatures for long periods, the meat spends hours in the 40-140°F danger zone where bacteria multiply rapidly. The extended cook time at the target temperature is what makes it safe — but you MUST reach those internal temps.
Use your meat thermometer. Check multiple spots. Don’t guess.
Smoking for Preservation: The Old Way
Before refrigeration, smoking was one of the primary methods of meat preservation. The combination of salt curing, dehydration, and antimicrobial compounds in smoke (phenols, formaldehyde, acetic acid) creates an environment where bacteria can’t thrive.
To genuinely preserve it, you need to focus on a few key aspects.
- Salt cure. The meat must be cured with salt (and usually sodium nitrite) before smoking. This draws out moisture and inhibits bacterial growth.
- Extended smoking. Not a 12-hour brisket cook — days of cold or warm smoking to thoroughly penetrate the meat with antimicrobial smoke compounds.
- Dehydration. The surface of the meat must be dry enough that bacteria can’t colonize it.
This is how country hams, traditional bacon, and old-world sausages are made. It’s a different discipline from weekend BBQ smoking, and it’s a skill worth learning if you’re serious about food independence. A proper smokehouse — even a small one built from a wooden cabinet or an old refrigerator — gives you the ability to preserve meat the way people did for centuries before electricity.
The Equipment Checklist
When I was starting out, I bought the wrong things first and spent more money correcting mistakes than I would have if someone had just told me what mattered. Here’s the order I’d recommend:
- Weber Smokey Mountain 18” — $350-$400. Your primary smoker.
- ThermoPro TP20 wireless thermometer — $55. Two probes, one for pit, one for meat.
- Chimney starter — Weber Rapidfire ($15). Lights charcoal without lighter fluid.
- Wood chunks — $15-$20 per bag. Start with cherry and oak.
- A-MAZE-N pellet tube — $15-$25. For cold smoking cheese and salt.
- Pink butcher paper — roll of 150 feet ($20). For wrapping brisket and pork butt.
- Heat-resistant gloves — fireproof BBQ gloves ($15). You’re handling hot grates and heavy meat.
Total: about $500 to get started properly. You can go cheaper — a UDS build cuts the smoker cost to $75 — but don’t cheap out on the thermometer. Temperature knowledge is everything.
That First Brisket, Revisited
Travis still brings up that October 2019 brisket. Every time he comes over for a cook — which is most weekends now — he looks at whatever’s coming off the smoker and says “remember that first one?” Yeah, I remember. The dog remembers too.
But here’s the thing. That terrible brisket taught me more than any YouTube video or Reddit thread ever could. It taught me that temperature matters more than time. Cheap equipment without knowledge? Produces expensive garbage. Resting meat isn’t a suggestion — it’s physics. And smoking meat isn’t something you master on the first try or the fifth try. It’s a skill you build over years, one cook at a time, adjusting, learning, occasionally ruining dinner and ordering pizza instead.
Seven years later, my smokehouse has a thermometer on every rack, a wood pile organized by species, and a notebook — an actual paper notebook — where I’ve logged every significant cook. Time, temperature, wood, weight, weather, what I’d change next time. That notebook has more useful information in it than everything I’ve ever read online about smoking meat.
Start with a pork butt. Get a real thermometer. Use good wood. Keep notes. And when you ruin your first brisket — because you will — know that you’re in good company.