Last summer, my dad purchased 12 acres of undeveloped land in the Ozarks. The property had no electricity, no running water, and no buildings—just trees, rocks, and plenty of untapped potential. Naturally, his first concern was how we would secure a water source.
So I did what I always do. I went full research mode. I’m talking spreadsheets with cost-per-gallon calculations, state permit databases, USGS groundwater maps, YouTube videos of guys drilling wells in their backyards, county well logs going back to the 1980s. Three weeks of this. My mom told me to go outside. I told her I was solving hydrology.
This article contains affiliate links. If you buy something through these links, we earn a small commission at no extra cost to you. This helps us keep producing free content.
Here’s what I found: getting water off-grid isn’t one decision. It’s a matrix of decisions based on your land, your budget, your geology, and your state’s permit requirements. If you’re working through a complete guide to off-grid living, water is the thing you solve first. Before solar. Before shelter. Water.
And if you’ve already set up rainwater harvesting, that’s awesome — but rainwater alone won’t cut it for most year-round off-grid situations. You need a primary source. Let’s talk about your options.
The Big Picture: Comparing Your Water Source Options
Before I get into the details, here’s the comparison table I built. This is the thing I wish someone had handed me before I spent three weeks in spreadsheet purgatory.
| Water Source | Typical Cost | Depth Range | GPM Flow | DIY Possible? | Best For |
|---|---|---|---|---|---|
| Drilled well | $5,000–$15,000+ | 50–500+ ft | 3–15 GPM | No | Reliable year-round supply |
| Driven point well | $200–$600 | 10–30 ft | 1–5 GPM | Yes! | Shallow water tables, sandy soil |
| Hand-dug well | $500–$3,000 | 10–50 ft | 0.5–3 GPM | Yes (hard work) | Rocky areas, historical method |
| Natural spring | $200–$2,000 | Surface | 0.5–10+ GPM | Yes | Properties with spring activity |
| Rainwater harvest | $500–$5,000 | N/A | Varies | Yes | Supplement or arid regions |
GPM = gallons per minute. That number matters more than you’d think. A family of four uses roughly 100–200 gallons per day. At 3 GPM, you can fill a 200-gallon tank in just over an hour. At 0.5 GPM, you’re looking at nearly 7 hours. Numbers matter!
Drilled Wells: The Gold Standard (and the Price Tag)
OK so here’s where it gets cool — and expensive. A drilled well uses a rotary or percussion drill rig to bore through rock and soil until it hits an aquifer. These wells can go 50 feet deep or 500+ feet deep depending on your geology.
Cost breakdown: Drilling runs $15–$50 per foot depending on geology. Add casing ($500–$2,000), pump and pressure tank ($1,000–$3,000), and cap/seal ($100–$300). Total for a 200-foot well: roughly $6,000–$15,000.
That per-foot cost swings hard. Sandy soil in coastal plains? Maybe $15/ft. Granite in New England? $50/ft or more. The county well logs for our Ozarks property showed wells averaging 180 feet deep. At $25/ft, that’s $4,500 just to make the hole.
When to drill: Water table deeper than 25–30 feet, you need reliable year-round flow, or your county requires it.
The thing that surprised me: most well drillers won’t guarantee they’ll hit water. They guarantee the hole. You pay either way. Check those county well logs before you write the check!
Pull County Well Logs Before Hiring a Driller
County well log databases (available free online in most states) show the exact depth and yield of every permitted well in your area. They tell you the typical depth you’ll need to drill and the expected flow rates — before you spend a dollar. Most well drillers won’t guarantee they’ll hit water. You pay for the hole either way.
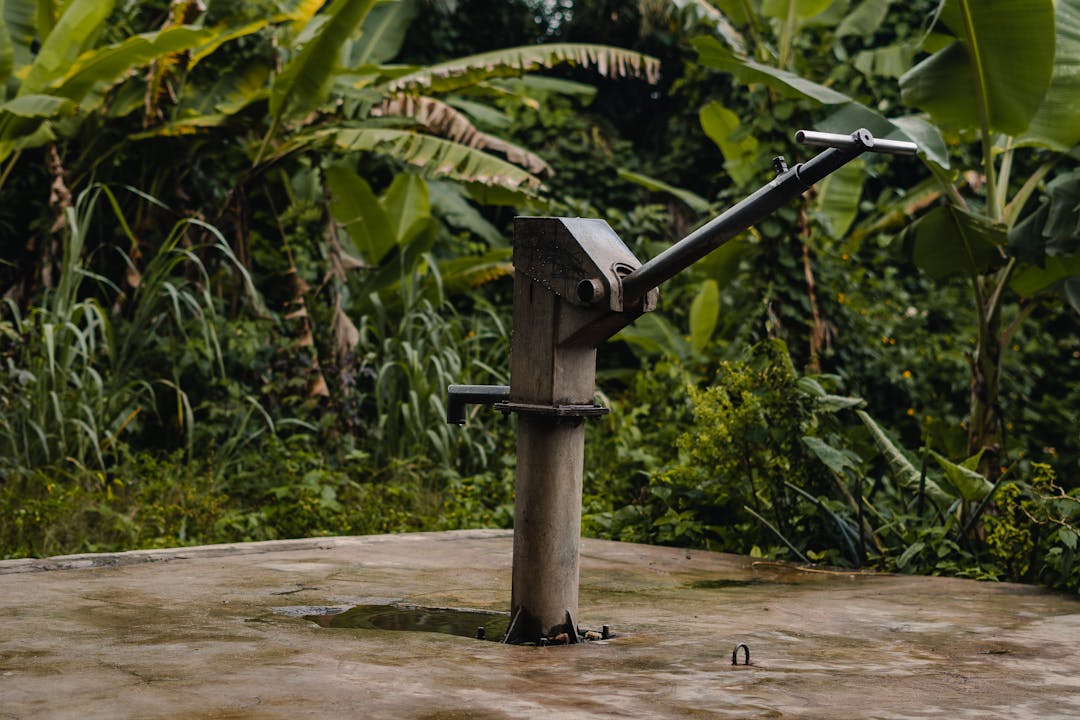
Driven Point Wells: The DIY Option That Actually Works
This is the one that got me genuinely excited. A driven point well (also called a sand point well) is literally a pointed screen you hammer into the ground until you hit water. People have been doing this for over 150 years.
What you need: A well point screen ($30–$60), galvanized pipe sections ($15–$25 each), a drive cap, post driver, and a hand pitcher pump ($60–$150). Total: $200–$600.
Fair warning: Only works if your water table is within 25 feet AND your soil is soft enough to drive through. Sandy soil, loose gravel, silt — perfect. Clay, hardpan, rock — forget it.
I watched a guy on our neighbor’s property drive a sand point well in about 4 hours. Hit water at 14 feet. Ran slightly sandy for the first day, cleared up by day two. 14 feet! Under $300!
Step by step: Screw the well point onto your first pipe section, start driving with a post driver, add pipe sections as it goes deeper, test for water every few feet, and when you hit the water table, drive 3–5 more feet in. Attach your pump and go.
One note: driven point wells are shallow, so they’re more vulnerable to surface contamination. Test your water — more on that below.
Driven Point Wells Only Work in the Right Soil
Before ordering a sand point well kit, confirm two things: your water table is within 25 feet (check county well logs), and your soil is sandy, silty, or loose gravel (not clay or rock). Attempting to drive a point through hardpan or clay is futile and will damage the equipment. Get a soil probe or call your county extension office if you’re unsure.
Hand-Dug Wells: Old School but Still Viable
People dug wells by hand for thousands of years. It works in situations where driving a point isn’t possible and you can’t afford a driller. Typically 3–5 feet in diameter, 10–50 feet deep, lined with stone or concrete rings, producing 0.5–3 GPM.
Cost ranges from $500 (all DIY labor) to $3,000+ with hired help. Output is lower than drilled or driven wells, and they’re the most susceptible to drought. Not my first choice, but it’s a real option on a tight budget.
Natural Springs: The One That Surprised Me Most
OK, this is the part of my research that blew my mind. Our Ozarks property has a spring. We didn’t even know about it until I was hiking the back corner of the property with a USGS topo map and noticed a blue line that crossed our boundary. Walked over there and found water seeping out of a limestone outcrop at maybe 2 GPM.
Free water. Gravity-fed. No pump needed. No electricity. No drilling. Just… water, coming out of the ground, all by itself.
Developing a spring means:
- Excavating around the source to expose the flow
- Installing a spring collection box — basically a watertight container that captures the water as it emerges
- Running an overflow pipe so excess water drains away
- Piping the collected water to your home or storage tank
- Protecting the uphill area from contamination (no livestock, no septic, no chemicals)
Cost: $200–$2,000 depending on how elaborate your collection system is. Ours cost about $400 in materials — concrete collection box, PVC piping, gravel for drainage, and a sediment filter housing at the house end.
The reality check: Springs can be seasonal. Ours drops to about 0.5 GPM in August — still 720 gallons per day, plenty for a household — but way less than the 2+ GPM we see in spring (the season, not the water feature… English is weird). Monitor flow across all four seasons before relying on one as your sole source.
Springs also need uphill protection. Animal waste, fertilizer, septic leachate — anything uphill can end up in your water.
Springs Are Vulnerable to Uphill Contamination
A natural spring collects and concentrates surface water from its entire uphill watershed. Animal waste, fertilizer runoff, leaking septic systems, and chemical spills anywhere uphill can contaminate your spring without any visible sign at the source. Always test spring water at a certified lab and protect a minimum 100-foot uphill exclusion zone from any contamination sources.
Pumps: Getting Water From Down There to Up Here
Unless you’ve got a gravity-fed spring (lucky!), you need a pump. Here’s what works off-grid.
Hand pumps are the zero-electricity option. A cast iron pitcher pump ($60–$150) works on wells up to about 25 feet deep. For deeper wells, you need something like a Simple Pump or Bison pump — deep well hand pumps that can pull water from 200+ feet. Those run $800–$2,000. Expensive, but they work without any power at all. Ever.
Solar pumps are my favorite solution. A 12V solar well pump paired with a solar panel can push water from 100+ feet deep into a storage tank. Flow rates are modest — 1–3 GPM typically — but they run all day for free. A basic setup (pump + panel + controller) runs $300–$800. We’re putting one on our Ozarks well.
If you’re already running a solar power system, you can power a standard 12V or 24V DC pump from your battery bank.
12V DC pumps like the Shurflo demand pump ($70–$120) are great for pressurizing water from a storage tank to your house. They give you 30–45 PSI, which is enough for a sink, shower, and basic plumbing. Run them from a battery bank charged by solar.
Quick pump comparison:
| Pump Type | Cost | Max Depth | Flow Rate | Power Needed |
|---|---|---|---|---|
| Pitcher hand pump | $60–$150 | 25 ft | Manual | None |
| Deep well hand pump | $800–$2,000 | 200+ ft | Manual | None |
| Solar submersible | $300–$800 | 200+ ft | 1–3 GPM | Solar panel |
| 12V DC pressure pump | $70–$120 | Surface tank | 3–4 GPM | 12V battery |
| AC submersible | $500–$1,500 | 500+ ft | 5–15 GPM | 120/240V AC |
Water Testing: Don’t Skip This
Every water source needs testing before you drink from it. Every. Single. One.
Test for: coliform bacteria (especially E. coli), nitrates, pH/hardness, and iron/manganese. A basic water test kit runs $25–$50. For a proper lab analysis, send a sample to a state-certified lab — usually $50–$150 for a full panel. Your county health department can point you to approved labs.
Test annually after that. Water quality changes, especially in shallow wells and springs.
Permits: The Boring Part That Can Cost You Big
Well permits vary dramatically by state, and in some places, drilling without a permit is a misdemeanor.
Strict states tend to cluster on the coasts. California and Oregon lead the pack, along with Washington, Colorado, and New Mexico. Most of the Northeast too. Expect requirements for licensed drillers, construction standards, setback distances from septic systems, and inspections.
Lighter regulation: Many Southern and rural Western states have simpler processes. Some only require permits for wells over a certain depth. A few let you drill your own domestic well with no permit at all.
Always check: Your state DEQ or Water Resources website, county health department requirements, setback distances (typically 50–100 feet from septic, 100+ feet from livestock), and well construction standards.
Our Ozarks property needed a basic permit ($50 fee) and a 100-foot setback from our future septic system. If you’re reading first aid guides for off-grid prep, the water permit should be on the same checklist — handle it early.
Cost Comparison: What We Actually Spent
Here’s my spreadsheet summarized. Real numbers from our property.
- Spring development: $400 — collection box, pipe, filter
- Driven point well (backup): $280 — sand point, pipe, pitcher pump
- Water testing (2 sources): $110 — county lab, full panel
- Well permit: $50 — county filing fee
- Solar pump + panel: $450 — for the driven point well
- Filters, tank, piping: $280 — sediment filter, IBC tote, PVC
- Total: $1,570 — two independent water sources
$1,570 for two independent water sources. Compare that to the $8,000–$15,000 a drilled well would have cost.
My Recommendation: Layer Your Sources
Don’t rely on one water source. Our setup — spring primary, driven point well secondary, rainwater collection eventually — means if the spring slows in late summer, we’ve got the well. If the well pump breaks, we’ve got the spring. If both fail, the hand pump still works. Redundancy. Same principle my dad applies to everything.
What Surprised Me Most
I went into this assuming we’d need to spend $10,000 on a drilled well. That’s what most “off-grid water” articles lead with. But after three weeks of data — well logs, flow measurements, soil maps, cost analysis — the best answer for our specific property was a $400 spring development.
Your property is different. Your geology is different. But don’t assume the most expensive option is the right one. Pull the well logs. Walk your property with a topo map. Talk to neighbors. The data will tell you what works.
I’m 15 and I figured this out with a spreadsheet, a USGS website, and a willingness to walk around in the mud. You can too.
That spring on the back corner of our property? Still flowing. Still free. Still the best $400 we’ve ever spent.