This article contains affiliate links. We may earn a small commission if you purchase through these links, at no extra cost to you.
Daniel Boone National Forest. Kentucky. I got properly lost.
Not the “hmm, which trail was it” kind of lost. The kind where you sit down on a log, look around in every direction, and realize you genuinely have no idea where you are. No idea which direction leads back to your truck. No idea if your truck is two miles away or ten.
I’d been following a creek drainage to scout a hunting spot, went off-trail, and let about three hours of bushwhacking erase any sense of direction I had. My phone was dead — hadn’t charged it the night before because I figured I’d be out for a few hours. Didn’t have a compass. The canopy was so thick I couldn’t even see the sun to get a rough bearing.
I spent the night in the woods. Built a fire. Leaned against a rock. Stared at the dark. At dawn I found the creek again, followed it downstream for about two miles, and hit a gravel road. A farmer in an old Ford gave me a ride back to my truck. He didn’t say much. The look on his face said plenty.
Embarrassing? Oh yeah. But that night is why I now carry a compass and a printed topo map on every single trip into the backcountry. And it’s why I’m writing this. Because GPS is incredible until your battery icon turns red and then it’s just a dark rectangle that cost you $1,200 and can’t tell you which way is north.
Why GPS Will Fail You (Probably at the Worst Possible Moment)
I’m not anti-technology. I use GPS apps all the time. Gaia GPS on my phone is genuinely great. But I’ve watched GPS fail in ways that matter.
Cold weather kills lithium-ion batteries faster than most people expect — I’ve watched a fully charged phone drop to 15% in about three hours when temps were in the teens. My buddy Tom had his phone shut down completely during a January hike in the Smokies. He was relying on it for navigation. The look on his face when the screen went black. I felt bad for him but also… come on, man. Backup plan.
Then there’s signal. Deep canyons, dense canopy, narrow gorges — GPS gets spotty or useless. I was in a narrow gorge at Red River Gorge once where my phone’s GPS dot was bouncing around like a pinball machine. Placed me on one ridge, then another, then in the middle of a lake that didn’t exist. Real helpful.
And the physical stuff. I dropped mine in a creek in 2016. Three-foot fall. Shallow water. Dead phone. If your entire navigation system can be destroyed by a stumble on a wet rock, maybe — just maybe — it shouldn’t be your only option.
Reading a Topo Map (It’s Not Spaghetti)
I think most people look at a topographic map and see chaos. Brown spaghetti lines going every direction. Numbers that don’t seem to mean anything. I get it. I felt the same way the first time.
But once you understand what those lines mean, a topo map is basically a 3D picture of the land squished flat onto paper. And it’s honestly kind of elegant once it clicks.
Those brown lines are contour lines. Each one represents a specific elevation above sea level. The number printed on the line tells you how high. Lines close together? Steep. Gonna hurt going up. Lines far apart? Flat or gently rolling. Lines that form a V pointing uphill? Creek or drainage. V pointing downhill? Ridge.
Here’s how I explain it when I’m teaching, and I know this is a weird analogy but stay with me. Imagine pouring chocolate syrup over a basketball. The syrup pools in rings as it flows down, right? Each ring of syrup is like a contour line. The steeper the surface at any point, the closer the rings are together.
Weird? Yes. But I’ve used this with about fifty students and it’s the one that clicks every time. One guy told me he couldn’t unsee the chocolate basketball when looking at maps. You’re welcome, I guess.
One thing that trips people up, and I’ve watched it happen with my own students: the contour interval. Most USGS 7.5-minute quads use a 40-foot interval — each line represents 40 feet of elevation change from the next one. Some maps use 20 feet. Check the legend at the bottom. I’ve seen people miscalculate elevation gain by HALF because they assumed the wrong interval. Easy mistake. Big consequences when you’re trying to figure out if that ridge is 800 feet above you or 400.
Another thing on topo maps that people ignore: the declination diagram. That little diagram in the margin tells you the difference between true north (top of the map) and magnetic north (where your compass actually points). These are not the same thing. More on this in a minute. But ignoring declination means your navigation will be off. In parts of the Pacific Northwest, magnetic declination is around 15 to 16 degrees east. Over a mile of travel, that error puts you about a quarter mile off your intended line. That’s the difference between hitting the trail junction and walking into a swamp.
Check the Declination Diagram Before Navigating — It Changes by Location
The difference between true north and magnetic north (magnetic declination) varies significantly by location and changes over time. In the Pacific Northwest it exceeds 15 degrees east — enough to put you a quarter mile off your intended line after one mile of travel. Always check the declination diagram printed in your map’s margin, and verify the current value at ngdc.noaa.gov, as older maps may show outdated figures.
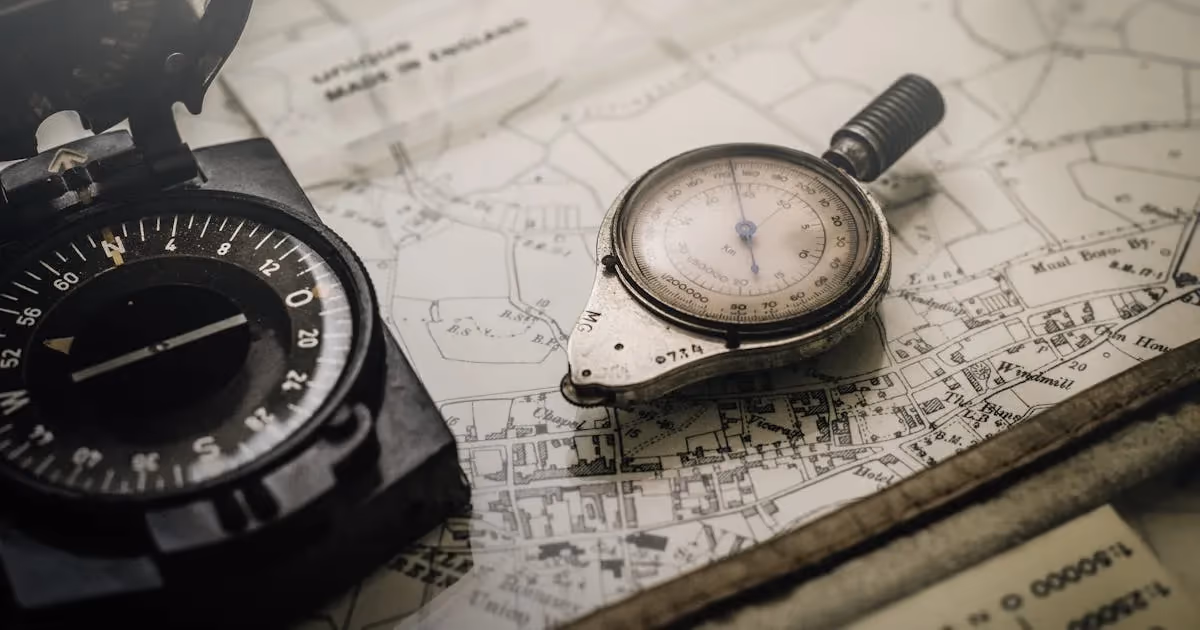
Using a Compass — Simpler Than People Think
A compass does one thing. Tells you which direction is north. Everything else is just clever applications of that one fact.
You don’t need an expensive one. A basic orienteering compass — clear baseplate, rotating bezel, direction-of-travel arrow — runs $15 to $30. I’ve been using a Suunto A-10 for years. Paid $20. Still works perfectly. The fancier models add a mirror for more precise bearings. Nice but not necessary.
Here’s the basic process:
Everything starts with orienting your map. Lay it flat. Put compass on the map. Rotate the map until the compass needle lines up with the north lines on the map (after accounting for declination). Now your map matches the real world. The creek on your left in real life should be to the left on the map. If it’s not, something’s wrong. Start over.
Finding yourself on the map is where people get stuck. Look around for features you can identify — a lake, a peak, a trail junction, a creek intersection. Find those same features on the map. If you can see two or more landmarks, triangulation gives you a pretty precise position. In heavy forest though? I usually rely on dead reckoning from my last known position, tracking direction and distance as I go. Imperfect. But better than guessing.
Once you know where you are, plot your bearing. Put the compass edge on the map connecting where you are to where you want to be. Rotate the bezel until the orienting lines are parallel with the map’s north-south grid lines. Read the bearing at the direction-of-travel arrow. Add or subtract declination. Now you have a heading.
To follow it, hold the compass level and turn your body until the needle sits in the orienting arrow — “red in the shed” as my old scoutmaster used to say. (Not the most creative mnemonic but I have literally never forgotten it. Twenty-five years later.) Pick something in the distance on your bearing line — a specific tree, a rock, a hillside feature. Walk to it. Take another bearing. Repeat.
Is it as easy as following a blue dot on a screen? No. It takes practice and attention. But it works everywhere on earth, in any weather, with zero batteries. Most people can learn the basics in about two hours of practice. Mastering it takes longer. But basic proficiency? An afternoon in a park with a map.
Practice in a Park With GPS Running as a Safety Net
The best way to learn compass navigation is to practice it in a local park or state forest where you can compare your work against GPS in real time. Take a bearing to a feature, walk it, and check how close you arrived. Repeat until your compass bearings consistently get you within 50-100 meters of your target. This builds genuine confidence before you need the skill in a situation where the GPS isn’t there as backup.
Natural Navigation — When You Have Nothing
Phone dead. No compass. Standing in the woods feeling foolish. I’ve been exactly there. Here’s what I know about navigating with nothing but your eyes and your brain.
The sun is your first tool. It rises roughly east, sets roughly west, and sits due south at solar noon in the Northern Hemisphere. I say “roughly” because the exact position varies by season and latitude — in summer it rises well north of east, in winter well south. But as a general reference? Way better than guessing.
Stick shadow method works if you’ve got time and patience. Stick a straight stick in the ground. Mark the tip of its shadow with a pebble. Wait 15 to 20 minutes. Mark the new shadow tip. Draw a line between the two marks. That line runs roughly east-west, with the first mark being west and the second east. I’ve tested this probably forty times in different conditions. It’s not precision navigation. But it’ll keep you from walking in circles. And not walking in circles is sometimes the whole game.
At night, Polaris — the North Star — sits almost directly over the North Pole. Find the Big Dipper. The two stars forming the outer edge of the “cup” point right to Polaris. Follow them about five times the distance between those two pointer stars. There it is. I taught my daughter this when she was seven and she still points it out every time we’re outside at night. Probably the most useful astronomy lesson I’ve ever given.
When you’ve got nothing else, read the land. Water flows downhill. Creeks merge into rivers. Rivers lead to civilization — eventually. When I was lost in Daniel Boone, following the creek downstream was what saved me. It’s not a guaranteed strategy everywhere — in huge wilderness, a creek might run fifty miles before hitting a road. But in most of the eastern United States? Following water downhill will get you somewhere within a few miles. Maybe more. But somewhere.
Moss on trees. You’ve heard this one. Moss grows on the north side. Here’s the truth: that’s mostly unreliable. Moss grows where it’s moist. In deep forest, that can be any side depending on drainage, canopy, local moisture patterns. I’ve seen trees with moss on all four sides. So take that old Boy Scout tip with a VERY large grain of salt.
What IS somewhat useful is tree growth patterns. In open areas, trees often have more branch growth on their south-facing side because that’s where the sun is. Not always. Not precisely. But as one more data point among several? Sure. Stack enough imperfect indicators together and you get a rough direction.
Lessons From Spending a Night Lost in Kentucky
That night in Daniel Boone taught me things I don’t see in most navigation articles.
My first instinct when I realized I was lost was to keep walking. Find a road. Find a trail. Find SOMETHING. But aimless movement in unfamiliar terrain usually makes things worse. You burn energy. You get farther from where people might look for you. In rough terrain you risk a twisted ankle or worse. I sat down, built a fire, and waited for dawn. Best decision I made that entire day. Maybe that month.
The other big lesson: tell someone where you’re going. I hadn’t told anyone exactly where I was. Nobody knew which trailhead I’d started from or when I expected back. If I’d broken an ankle instead of just getting turned around, it might’ve been days before anyone noticed I was missing. Now I text my wife a photo of the trailhead sign before every trip. Old school? Sure. But simple and effective beats clever and forgotten.
One more thing I added to my kit after that trip: a whistle. Three blasts is the universal distress signal. A whistle carries way farther than shouting and doesn’t tire you out. I keep one on my pack’s chest strap. Weighs nothing. Costs two dollars. Could save your life if someone’s within earshot.
The skill that ties it all together is practice — specifically, practice when it doesn’t matter. I started doing compass work in my local state park where I could see roads in every direction and there was absolutely zero chance of actually getting lost. Took bearings, walked them, checked against GPS. Did this maybe six or seven times before I trusted myself in real backcountry. Boring Saturdays. Worth every one of them.
Stop Moving When You Realize You're Lost
Every experienced search and rescue professional says the same thing: people who stay put after realizing they’re lost are dramatically easier to find than people who keep moving. Movement burns energy, increases injury risk, and makes your behavior unpredictable to rescuers. If you’re genuinely disoriented, sit down, build a fire if possible, and wait for light. The farmer who picked me up in Kentucky found me because I was walking a road — but I got there by stopping and waiting for dawn instead of thrashing through palmetto scrub in the dark.
Real-World Navigation — How I Actually Do It
Abstract instructions only go so far. Here’s how I actually navigate a backcountry trip using a map and compass, where the effectiveness is put to the test.
Last fall. Cherokee National Forest. Parked at a trailhead, planned to hike about two miles to a ridge saddle where I’d scouted deer sign the week before. Thick forest. No cell service. Classic scenario for old-school navigation.
Before I left the truck, I oriented my map and identified the saddle. Took a bearing: 247 degrees magnetic. Distance: about 1.8 miles. Also identified a catching feature — a creek running along the base of the ridge. If I overshot the saddle, I’d hit the creek and know to turn back. Built-in safety net.
Every ten minutes or so, I stopped and checked my bearing. Also counted paces — I know my pace count is about 62 double-steps per 100 meters on flat ground and closer to 75 in rough terrain with elevation change. So 1.8 miles is roughly 2,900 meters. Call it 2,100 double-steps in that terrain. Rough math. But it gives me a sanity check. If I’ve counted 2,500 paces and haven’t hit the saddle, something might be off.
Hit the saddle almost exactly where I expected. Took about an hour forty. Bearing was off by maybe 50 meters — came in slightly south and had to adjust uphill for a couple minutes. In practice, that’s normal. Perfect bearings are for textbooks. Real-world navigation is constant small corrections.
The point isn’t precision. The point is getting close enough that your eyes and common sense can do the rest. If you can get within 200 meters of your target with map and compass, you’re golden. Look around. Read the terrain. Adjust. That’s how it actually works.
Gear
For a compass, I’ve been using a Suunto A-10 ($20) for years. Paid $20. Still works perfectly. If you want a mirror sighting system for more precise bearings, the Suunto MC-2 runs $50-60. I own both. Use the A-10 more because it’s lighter and honestly? For most navigation, a general bearing is good enough. I’m lazy about precision when a rough heading gets me where I need to go.
For maps, USGS 7.5-minute quadrangles are free to download from the USGS website and print at home. Get them printed on waterproof paper though — Rite in the Rain makes printable sheets, or some outdoor stores will print waterproof maps for a few bucks. A soggy map is a useless map. Found this out the hard way on a rainy October hunt when my map turned to mush in my jacket pocket.
To carry your map, any dry bag or large Ziploc works. I use a Sea to Summit map case ($12). Clear on both sides so I can read the map without taking it out. In the rain, that’s a big deal.
Frequently Asked Questions
How accurate is compass navigation compared to GPS? Not as precise for pinpoint positioning. GPS puts you within about 10 to 15 feet. Compass navigation, depending on skill, might get you within 100 to 300 meters. But for practical wilderness navigation? That’s usually plenty. You don’t need to find exact coordinates. You need to find the trail, the camp, the creek crossing. And for that, a compass works just fine.
Should you still carry a GPS device? Yeah. I do. I’m not saying ditch GPS. I’m saying don’t rely on it exclusively. My system: GPS primary, map and compass backup. When the technology fails — and if you spend enough time outside, it WILL fail — you’ve got a fallback that works with zero batteries and zero signal.
How long does it take to learn compass navigation? Basic skills — orienting a map, taking a bearing, following it — maybe two to three hours of practice. Real comfort and confidence? Probably ten to fifteen outings where you use both GPS and compass side by side, comparing your compass work against the screen to build trust in your own skills. That’s roughly what it took me. Give yourself time. Don’t expect mastery on day one.
If you want to test your navigation knowledge, try our wilderness survival basics quiz. For a deeper dive on map skills, our guide on how to read a topographic map breaks down contour lines, elevation, and terrain features in plain English. And if you’re planning extended backcountry trips, check out the emergency shelter guide — because if you DO get lost, knowing how to build shelter is the next most important skill after staying found.