This article contains affiliate links. We may earn a small commission if you purchase through these links, at no extra cost to you.
The fall of 2011 I was sitting at 7,800 feet in Colorado’s Flat Tops Wilderness with a problem. My hunting partner had just dropped a cow elk — about 300 pounds of meat — and the weather was threatening to turn. We’d packed in for six days. There was no road, no cooler big enough, no way out before the meat would spoil if the temperature climbed.
So we did what my grandfather taught my dad and my dad taught me: we built a fire, found some hardwood, and smoked the meat.
Four days later we rode out with every scrap of it still good. Some of it sat in saddlebags for another 18 hours before hitting pavement. Still fine.
I want to tell you exactly what we did — not the textbook version, but the actual version that works when you’re tired and dirty and don’t have anything fancy.
Table of Contents
- Why This Actually Works
- Salt First, Always
- Building the Smoke
- What Wood You Use Matters
- Reading the Smoke and Watching the Meat
- How You Know It’s Done
- Storing It After
- Things That Go Wrong
Why This Actually Works
People treat smoking and curing like it’s some kind of old folk magic. It’s not complicated. Bacteria that spoils meat needs moisture to thrive. Take away the moisture, you’ve killed their food supply. That’s the curing part. Then smoke coats the outside surface with compounds — phenols mostly, some acetic acid — that are genuinely antimicrobial. Salt handles the inside; smoke handles the outside. Together they’ve kept hunters and explorers fed for thousands of years before anyone had a refrigerator.
The thing most people get backwards is thinking the smoke is doing most of the work. It isn’t. Salt is. I’ve eaten properly salt-dried meat that had zero smoke on it — still perfectly edible after two weeks in a warm pack. Smoke extends that and adds flavor, but if you skip the salt step, you’ll be throwing out a batch of rotten meat regardless of how much smoke you put on it.
So: salt first, smoke second. In that order. Every time.
Salt First, Always
Dry curing is what I use in the backcountry because it’s faster and doesn’t require a pot. You coat the meat — generously, not like seasoning, more like burying it — in coarse non-iodized salt. About a tablespoon per pound is a starting point, but I tend to go heavier. The goal is a visible white crust on every surface. If it looks seasoned, it’s not enough.
Cut your meat thin before you salt it. Quarter-inch strips are ideal. Thicker cuts can work but they need more time and you really should add pink curing salt (Prague Powder #1) if you’re going past half an inch. I carry a small amount on any backcountry trip that might involve meat. Prague Powder #1 is cheap and it prevents botulism in thicker cuts — which is one of the ways people die trying to preserve meat at home without knowing what they’re doing.
For thin strips, leave the salt on 30 to 45 minutes and you’re ready to smoke. Flip them once partway through. For anything thicker, go 3 to 4 hours minimum, turn them a couple times.
Brine curing is the other option and I prefer it when I have the gear — a pot and a gallon of water. Mix about a cup of salt into the gallon and submerge your meat. If you have brown sugar, a quarter-cup in there adds flavor and helps the surface crust better once it hits the smoke. Let thin strips sit 4 to 6 hours, or overnight if you have time. The salt penetrates more evenly through brine, so the end product is more consistent. But in the field with tired legs and a failing fire, dry curing gets the job done.
Temperature zone matters when smoking
You want internal temperature above 140°F during smoking. Below that you’re in the bacterial danger zone — the meat is staying warm enough for bacteria to multiply while also being too wet. A cheap clip-on dial thermometer takes the guesswork out of it.
Building the Smoke
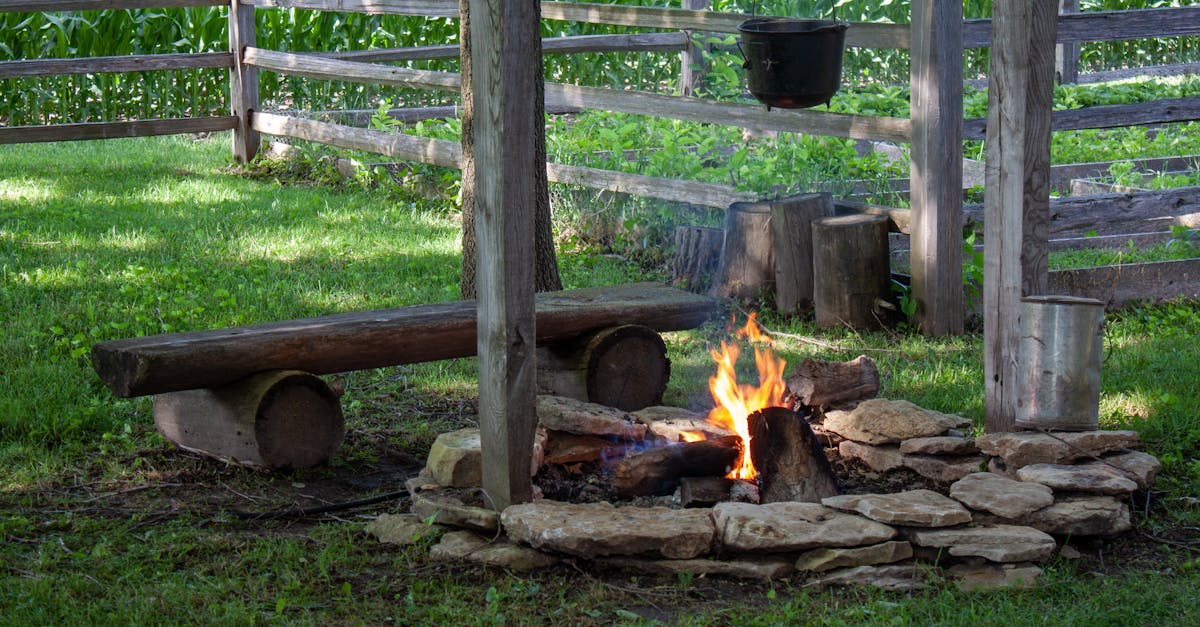
In the Flat Tops in 2011 we used a setup my dad showed me years earlier. Two shallow holes about three feet apart, connected by a trench. Fire in one hole, meat hung over the other. The smoke travels through the trench, cools a bit, and rises up around the meat at a lower, steadier temperature than if you had the meat directly over the fire. I’ve also done a simpler version — just a fire pit with green branches laid across the top and meat draped on the branches — and that works fine too if you keep the fire small and stay close to it.
For a teepee smokehouse: cut five or six green poles, lash them at the top, cover the sides with a tarp or pack blanket leaving a gap at the peak for the smoke to exit. Small fire at the base. Meat hung from the center lashing. It looks ridiculous but it holds smoke well and you can walk away from it for an hour without babysitting.
At home, a Weber Smokey Mountain is the workhorse setup. I’ve had mine eleven years. It’s not exciting but it runs 225°F for eight hours without much fuss. For cold smoking at lower temperatures you’d need a separate smoke generator, but that’s a different rabbit hole than field preservation.
The core thing: keep the fire small. You’re not trying to cook the meat. You’re drying it while exposing it to smoke. A raging fire cooks the outside before the moisture escapes from the inside, and then you’ve got jerky that looks done but will mold in a week. Low and slow is not just a BBQ saying.
What Wood You Use Matters
My first choice for venison and game birds is apple or cherry. Mild, slightly sweet, very forgiving if you run a little hot. Almost impossible to ruin meat with apple wood.
Hickory is good for elk and bear. Stronger. Goes heavy faster than you’d expect — use less than you think you need, taste-test after the first hour, and add more if you want more. Mesquite I’d leave for beef. Too aggressive for most game. Burns hot too, which fights against what you’re trying to do.
The hard rule: no conifers. Pine, spruce, cedar, fir — all of them have resins that turn into creosote when they burn. At low concentrations creosote tastes bitter. At higher concentrations it’s toxic. This is not hypothetical — I’ve ruined a batch of meat with one piece of pine that snuck into my wood pile, and I’ve talked to at least three people over the years who’ve gotten sick from this. In the field, use hardwoods you can identify. Hardwoods have broader leaves; conifers have needles or scales. Oak scrub, alder, serviceberry, or wild apple are all good. When in doubt, don’t use it.
Conifer wood will ruin your meat — and possibly make you sick
Pine, spruce, fir, and cedar produce resins when burned that coat the meat in creosote. Even a small amount ruins the flavor. Enough of it can make you genuinely ill. Only use hardwoods you can positively identify. In the backcountry, when in doubt, skip the wood entirely and just heat-dry without smoke.
Reading the Smoke and Watching the Meat
After the salt cure, rinse the excess salt off with clean water and pat the meat dry. Then let it air-dry for 30 to 60 minutes before it goes over the smoke. You want the surface to feel slightly tacky — hunters who do this a lot call it the pellicle and yes it matters. Smoke sticks better to a tacky surface than a wet one.
Thin-and-blue is the smoke you want. Not thick white smoke, not gray. Thin blue-white smoke that drifts lazily. Thick white smoke means the fire is smothering — too much wet wood or not enough air. Add a little more air to the fire base and swap out any green fuel for dried wood. If you’re getting gray smoke, you’ve got resin burning somewhere. Pull the meat, fix the fire, start over.
At 140°-160°F, thin quarter-inch strips take 4 to 6 hours. Thicker half-inch cuts need 8 to 10. Cold smoking below 100°F is the traditional approach for long shelf-life and it works, but it requires longer time — 16 to 24 hours — and you really need to have cured the meat thoroughly first, or you’re giving bacteria a head start during the slow warm-up phase. I don’t recommend cold smoking for beginners or for field situations where you can’t monitor consistently.
Check the fire and flip the meat every hour. That’s about it for the technique. The patience is the hard part.
A Weber Smokey Mountain is the best $300 I spent on a piece of outdoor cooking equipment
Eleven years in, mine still holds temperature without drama. For home smoking operations where you want shelf-stable product, the ability to hold 225°F for 8+ hours without constant babysitting is the feature that matters most. Worth every penny.
How You Know It’s Done
People pull smoked meat too early. Every time. The outside gets that nice mahogany-black color and it looks done, but the inside is still moist enough to mold in storage. This is where the bend test matters more than any visual cue.
Fold a strip. It should bend without breaking, and have a slight give when you press the folded edge. If it snaps clean like a cracker you’ve over-dried it — still edible, just not optimal texture. If it folds flat and feels soft or damp, it’s not done.
The outside should feel genuinely dry to the touch. Cut a piece in half and look at the cross-section. Dark all the way through is what you want. Pale or moist-looking in the center means more time.
For safety, get the internal temperature above 160°F at some point during the process. Thin strips will hit that naturally during a 5-hour smoke at 150°F ambient. For anything thicker, check with a thermometer at the thickest point before you pull the meat.
Storing It After
For field storage without any gear: wrap cooled meat in paper — not plastic. Plastic holds residual moisture against the surface, and the meat you thought was done turns moldy inside the bag. Paper lets it breathe. A clean cloth works too. Store it away from direct light and don’t pack it tightly. Below 70°F ambient, properly smoked meat lasts 2 to 3 weeks. Higher than that, eat it within a week.
At home, paper bags in a cool pantry. A breathable cloth bag. Not an airtight container — the meat still needs to breathe slightly. Properly made jerky keeps 1 to 2 months without refrigeration. Once it’s fully dry (and I mean a full dry — no moisture left, the paper towel test comes back clean) you can vacuum seal it and it lasts 6 months. Frozen, up to a year.
Signs it’s gone bad: mold you can see, a slimy or tacky surface that isn’t from the original cure, and — most reliably — smell. Good smoked meat smells like smoke and salt. Off smoked meat has a sour, rank undertone that’s unmistakable. Trust that instinct.
Things That Go Wrong
The most common failure I see is not enough salt at the start. People treat the curing step like seasoning a steak. The salt’s job here is to draw moisture out of the meat — you need enough to actually do that work, not just flavor it. If the surface isn’t visibly crusted white, add more.
Hot fire is the other big one. A big fire gets you cooked-looking meat fast, but it seals the outside before the moisture inside can escape. What looks like done jerky is actually half-cooked meat with wet interior that’ll mold in four days. I’ve thrown out whole batches because I got impatient. The fire needs to be small.
Don’t crowd the racks. Strips touching each other means air isn’t moving around them, which means moisture isn’t escaping from the contact surfaces. An inch of space between everything — more if you have it. It makes a bigger difference than most people expect.
And pull it when the bend test says pull it, not when it looks done. The outside darkens and firms up way before the interior is actually dry. Look at the cross-section, feel the give when you fold it. Visual cues will lie to you here.
We rode out of the Flat Tops on day six with the meat in saddlebags. Last of it got eaten sitting in a parking lot at the trailhead — trail food becoming road food. My hunting partner kept saying it was the best jerky he’d ever had, which I’m pretty sure was mostly the altitude and the accomplishment talking.
But it held. That’s the point. Three hundred pounds of elk, no freezer, three days of uncertainty about the weather, and we didn’t waste an ounce of it.
Salt and fire and hardwood and patience. Learn this once and you’ll never wonder what to do with excess meat again.