This article contains affiliate links. We may earn a small commission if you purchase through these links, at no extra cost to you.
I was three miles into the Beartooth foothills before first light in the fall of 2019 — elk country, technically, but I’d spotted a muley buck the previous June while scouting and decided I wanted him more than I wanted elk that year.
I’d hiked three miles before first light to get above him. Wind was perfect — coming off the ridge down into the drainage where I’d seen him feeding at dusk. At 7:20 in the morning he stepped out of a pine thicket at 180 yards, quartering away. I was running a .30-06 with 165-grain Nosler Partitions, and I put the shot exactly where I’d practiced it a thousand times on paper.
He went 40 yards and tipped over.
None of it was luck. The shot was the easiest part. The three months before that shot — the summer scouting trips, the wind calculations, the decision on stand location, the gear choices — that’s what made it clean and simple when the moment came.
That’s what this guide is about. The before, the during, and the after. Everything that turns a deer season into a full freezer instead of a good story about the one that got away.
Table of Contents
- Pre-Season Scouting
- Stand Placement
- Weapon Choice: Rifle, Bow, or Muzzleloader
- Essential Gear
- Rut Tactics
- Shot Placement
- Tracking a Hit Deer
- Field Dressing Basics
- Meat Care in the Field
- FAQ
Pre-Season Scouting
Most deer hunters don’t scout nearly enough. They walk their property a few times in September, hang a stand, and call it done. Then they wonder why they’re seeing nothing.
I’ll be straight with you: the hunters I know who kill big deer consistently spend more time scouting than they do hunting. A 3:1 ratio isn’t unusual. Three days of serious scouting for every one day in the stand.
What you’re looking for:
Deer live in predictable patterns when they’re not spooked. They bed in thick security cover during daylight. They travel established corridors between bedding and feeding areas. They use the same trails, the same crossings, the same scrape lines year after year.
Your job in the off-season is to find those patterns before season opens — not during it.
Start with aerial imagery. Google Earth is free and surprisingly useful. Look for funnels: pinch points where terrain or vegetation forces deer movement through a narrow corridor. Creek crossings. Saddles between ridges. Fingers of timber extending into agricultural fields. These are the places deer have to pass through. That’s where you want to be.
Then walk it on foot. But not in September. Do your heavy boot-on-ground scouting in late winter and early spring, right after season closes. Rubs, scrapes, trails, and beds from the previous fall are still fresh enough to read, the woods are open with no foliage blocking your view, and you’re not burning that critical pre-season area with your scent. By April, whatever you disturb has months to settle before next fall.
What to look for on foot:
- Rub lines (multiple rubs running in a direction indicate travel corridor, not just random buck territory marking)
- Scrape complexes near pinch points or field edges
- Well-defined trails with visible depressions worn into the ground
- Beds in heavy cover — look for oval depressions with flattened vegetation, often with shooting lanes in multiple directions (deer don’t bed in corners)
- Mast trees — hard mast like acorns, especially white oak, will pull deer hard in early season
The Quality Deer Management Association (now the National Deer Association) has documented extensively how deer shift their core areas seasonally. Early season, they’re food-focused. Pre-rut, bucks start cruising. Rut, all bets are off. Late season, food again — high-calorie sources like standing corn or food plots near thick security cover.
Scout for each phase separately. The best early season stand location might be worthless for rut hunting. Know the difference.
Trail Camera Strategy
Run cameras on scrapes and travel corridors from September onward, but check them as infrequently as possible. Every visit burns scent. Set cameras to burst mode and check them on bad-weather days when you’re not hunting. Cell cameras solve this problem entirely if the budget allows.
Post-season scouting is the secret weapon. I do my most productive scouting in December and January. You can see everything. The timber is bare, tracks are fresh in any snow, and if you find a big rub cluster or a main travel corridor in the post-season, you know it was being used right through the end of season. That’s a high-confidence location for next year.
Stand Placement
You can do everything else right and still blow it here.
Stand placement is a combination of what the deer are doing and what the wind allows. Both matter. In my experience, hunters obsess over finding the deer and ignore the wind, which is why they get busted constantly.
The two cardinal rules of stand placement:
- You must have a wind that keeps your scent away from the deer’s approach
- You must have a shooting lane to where the deer will be
That’s it. Everything else is optimization.
Treestand vs. ground blind:
Treestands get your scent above the deer’s primary scent horizon and give you a shooting angle that clears brush. They work. But they require trees of the right size and positioning, they take time to hang properly, and they have safety requirements that are non-negotiable. Always use a fall-arrest harness. Every time. I’ve got 25 years in the woods and I don’t care how short the climb is — the harness goes on.
Ground blinds let you hunt anywhere, including places with no trees, and they’re better in some wind conditions because you’re sealed in. They require setup time well in advance of season — two to three weeks minimum — so deer in the area normalize to them. Pop them up at the last minute and deer will spook every time.
Height matters. Most hunters go too low in treestands. The minimum useful height is 15 feet; 20–25 feet is better for scent dispersal and shot angles. Higher also reduces the odds of a deer picking you up with its peripheral vision, which is more sensitive to movement at close range than most hunters realize.
Entry and exit routes are as important as stand location. The best stand in the world is worthless if you spook every deer getting in and out of it. Identify how deer move through the area and design your approach to avoid crossing those travel routes. Use creek drainages, field edges, or other natural features that let you slip in without being detected. Walk in before first light or well after dark. Rushing the entry costs you hunts.
Don't Overhunt Your Best Stands
Every time you sit a stand, you deposit scent and increase pressure on that area. Save your absolute best stand for when conditions are perfect — right wind, right phase of season, right weather. Hunt secondary spots on marginal days and protect your prime location.
Weapon Choice: Rifle, Bow, or Muzzleloader
There’s no wrong answer here. Only tradeoffs.
Rifle hunting is the most accessible starting point. Modern centerfire cartridges like the .308 Winchester, .30-06 Springfield, and 6.5 Creedmoor are capable, accurate, and widely available. The .308 and .30-06 have killed more deer than any other cartridges in North America — not because they’re magic, but because they’re proven and hunters have been running them long enough to trust them. The 6.5 Creedmoor has earned its reputation fast: flat trajectory, excellent terminal performance, manageable recoil.
For most whitetail hunting in the Eastern US, you won’t take shots beyond 200 yards. For western mule deer and open-country hunting, 300+ yard shots are realistic. Match the cartridge to the terrain and your actual shooting ability. A hunter who can’t consistently hit a 10-inch target at 200 yards has no business shooting at deer at 300.
Bow hunting extends your season — archery seasons typically open weeks before rifle seasons in most states — and forces you to get close. Most ethical bowhunters keep shots inside 40 yards, with 20–30 being ideal. That proximity requirement demands better scouting, better stand placement, and better scent control. It’s harder. But there’s something different about it. The whole game changes when you’re that close.
Compound bows are the default for most hunters because of their forgiving let-off and speed. Crossbows are legal in most states now and perform similarly to compounds in terms of effective range, though the debate in archery circles is still lively. Traditional archery — recurves and longbows — is a whole separate rabbit hole that I respect deeply but won’t pretend is beginner-friendly.
Muzzleloaders occupy a middle ground. Most states have dedicated muzzleloader seasons that give you another extended window to hunt. Modern inline muzzleloaders are accurate and reliable in ways their predecessors weren’t. They’re single-shot weapons, which focuses your mind considerably when a buck is 80 yards out.
The truth is: start with a rifle. Learn the fundamentals of deer hunting — scouting, stand placement, patience, shot discipline — with a platform that gives you some margin for error. Once you understand the game, pick up a bow or muzzleloader if you want more challenge and more time in the field.
Essential Gear
I’ve hunted deer with expensive gear and cheap gear. Both work. Here’s the short list of what actually matters.
Optics. A quality rifle scope is not negotiable. I run a Leupold VX-3i in 3-9x40 on most of my rifle deer setups. Budget-end scopes have inconsistent reticles and fail in the dark — exactly when you can’t afford a miss. For glassing in open country, a quality binocular matters. 8x42 or 10x42 are the sweet spots for most deer hunting applications.
Clothing. Layered system, not a single heavy jacket. Base layer wicks moisture. Mid layer insulates. Outer layer blocks wind and rain. Staying warm and quiet matters more than wearing any particular camo pattern — deer don’t see in color the way we do, but they’re exquisitely sensitive to movement and silhouette. Wool is underrated. It’s quiet, naturally odor-resistant, and retains warmth when wet.
Scent control. Scent-elimination sprays help but they don’t eliminate human odor — they reduce it. Wind is the real scent control tool. Spray down, store your hunting clothes in a sealed bag with dirt or leaves from the area, and hunt the wind. Don’t hunt a stand when the wind is wrong. Period.
Boots. Your feet determine your hunting. Cheap boots mean blisters and cold, wet feet, which mean early exits from stands and shortened hunts. Get quality waterproof insulated boots sized for the terrain. I wear different boots for cold-weather sit hunts versus active still-hunting or western hunts.
A quality knife. Every hunter needs a fixed-blade knife for field dressing. A 3.5 to 4-inch drop-point blade handles everything. Keep it sharp. A dull knife is more dangerous than a sharp one and does a worse job. I’ve had the same Buck 119 since I was apprenticing at a small butcher shop in Wyoming in my early twenties, and I’ve never needed anything fancier.
Pack. A daypack with enough room for water, food, first aid, knife, headlamp, paracord, and whatever calls or rattling antlers you’re running. For backcountry or western hunting, size up accordingly — you’ll need a frame pack for packing out meat on any significant hunt over rough terrain.
Safety harness. See above. Non-negotiable.
The One Piece of Gear Most Hunters Skip
A quality headlamp with fresh batteries. You’ll use it more than almost anything else — getting to the stand before dawn, tracking deer after dark, field dressing by lamplight. Get one that’s bright, reliable, and has a red-light mode to preserve your night vision.
Rut Tactics
The rut turns everything upside down. Bucks that were nocturnal ghosts on your trail cameras suddenly appear in open fields at 10 AM. Does get pushed through areas they don’t normally frequent. The whole predictable pattern you’ve been reading for months resets.
Here’s what most hunters do wrong during the rut: they keep doing what they were doing before it. They stay on the same food-to-bed travel routes that worked in October. Problem is, during the rut, bucks aren’t following food — they’re following does, and does are getting pushed away from their normal routes by bucks in pursuit.
Hunt the pinch points, not the food sources. During peak rut, a saddle between two ridges, a creek crossing that funnels movement through a 20-yard gap, or a narrow strip of timber connecting two larger blocks of woods will see more deer movement than the best food plot on the property. Bucks are covering ground looking for receptive does, and those funnels are where their paths cross.
All-day sits. The rut is the one time I’ll sit from before first light to after dark. Midday movement during peak rut is real. The 10–2 window is when many hunters are back at camp having lunch. That’s when some of the biggest bucks move. Don’t leave the stand.
Calling and rattling. Both work during the rut, and both can blow up in your face. Grunt calls mimic buck vocalizations and can pull in a cruising buck looking to find competition. Tending grunts (a series of short grunts) imitate a buck trailing a doe. Rattling imitates two bucks fighting, which is a strong stimulus during peak rut — it tells any nearby buck there are receptive does in the area.
The key with both: don’t overcall. Less is more. Call and then wait. Bucks circle downwind before committing, and if they smell you before they see what they’re looking for, they’re gone. Most bucks I’ve called in over the years actually came in from an unexpected direction — which is exactly why you always want to be thinking about your downwind side.
Estrus scents. I’m agnostic. They can work; they can also create a scent trail leading straight to your stand that a dominant buck identifies as wrong and avoids. If you use them, use them in drags to create a trail leading past your stand from the upwind side, not dripped around the stand itself.
The rut is forgiving in some ways and brutal in others. Bucks are doing things they’d never do any other time of year — but they can still smell you. Play the wind and stay on your best stand during peak rut. That’s the formula.
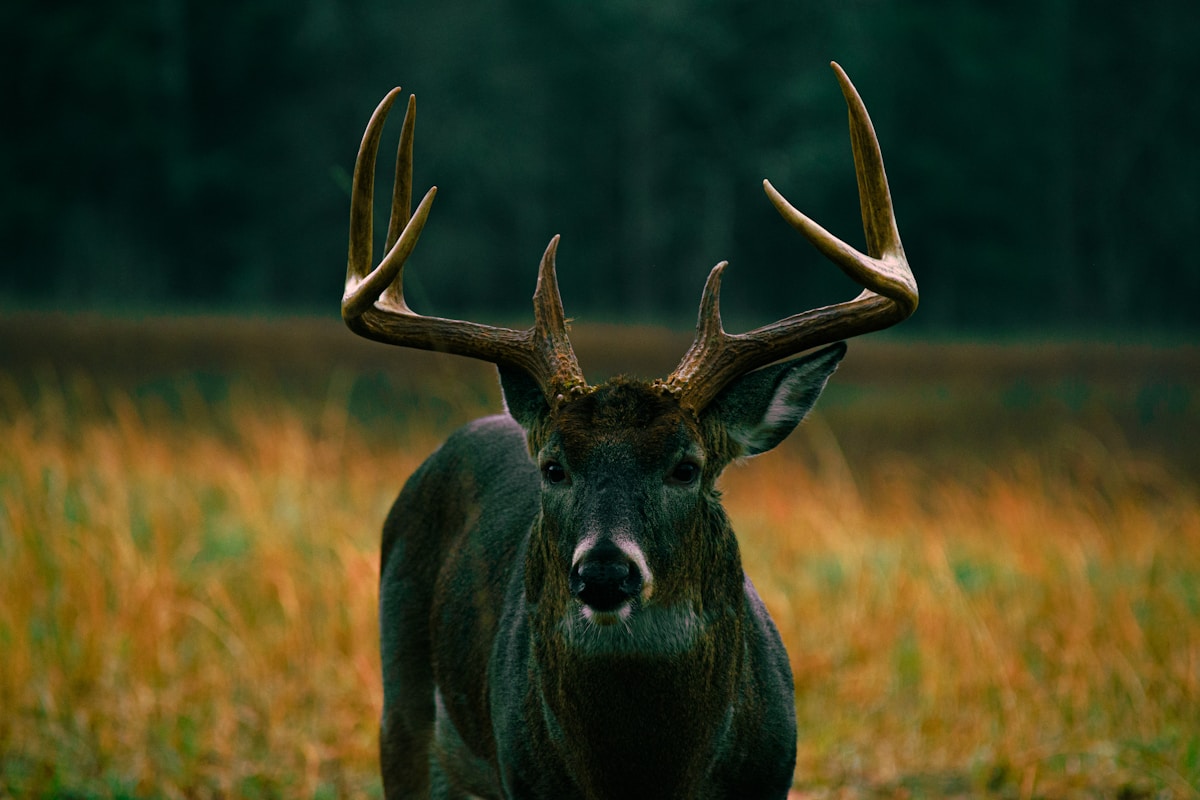
Shot Placement
This is where everything either comes together or falls apart.
I’ve spent time as a butcher — real hands-in-the-animal work, not just field dressing — and the knowledge you gain doing that professionally changes how you think about shot placement. You understand exactly where the vitals are, how they sit in the body cavity, and what a bad hit looks like from the inside.
The ethical kill zone:
Deer have a combined heart-lung vital zone of roughly 8–10 inches in diameter on a mature whitetail. That’s your target. Not the whole deer. Not a general direction. That 8–10 inch circle.
The lungs are your primary target. They’re large, they bleed heavily, and a double-lung hit results in a deer that rarely travels more than 100 yards. The heart sits just below the lungs at the bottom of the chest cavity, nestled behind the shoulder. A heart shot kills quickly.
The classic broadside shot:
For a broadside deer, aim just behind the crease of the front leg, one-third of the way up the body from the bottom of the chest. That puts you in the heart-lung zone. Don’t aim for the shoulder — you’ll hit bone and potentially lose the deer. And the meat damage from a shoulder hit is significant.
Quartering away:
My preferred shot angle with a rifle. The deer’s vitals are exposed on a slight angle, and a bullet or arrow entering behind the last rib and angling forward will pass through both lungs. On a hard quartering-away angle, aim for the off-side shoulder to drive the projectile through maximum vital tissue.
Quartering toward:
The trickiest angle and the one where bad shots happen most often. The near-side shoulder is protecting a portion of the vital zone. Wait if you can. If you can’t, aim for the center of the chest on a rifle shot. With archery equipment, I won’t shoot a hard-quartering-toward deer — too much chance of deflection off the shoulder and a wounded animal.
Head-on:
Don’t. The target is tiny, the margin for error is almost zero, and even a marginal hit can result in a crippled deer that’s nearly impossible to recover. Let the deer turn. Wait for a better angle. You’ve waited all season. Wait another 30 seconds.
Know Your Limits
Ethical shot distance depends on your equipment, your practice, and the conditions. If you can’t consistently hit a 10-inch paper plate at your intended maximum range, from field positions (not a bench), that’s your limit. In the field, add pressure, awkward positions, and adrenaline. Your effective field range is shorter than your range range.
Wait for the right shot. The rut gets people in trouble here — a big buck is trotting across an open field and hunters rush a marginal shot. Don’t. A clean miss is better than a wounded deer you lose. And losing a wounded deer is one of the worst feelings in this sport.
Tracking a Hit Deer
Mark the spot immediately. Before you do anything else. Drop a pin on your phone, tie flagging tape to a branch, note a landmark. The spot where the deer was standing when you shot is the beginning of your tracking job, and it’s easy to lose in the excitement of the moment.
Then sit down and wait. I know you don’t want to. But wait.
How long to wait depends on where you hit:
- Obvious double-lung hit: 30 minutes is plenty. The deer is almost certainly dead within 100 yards.
- Liver hit (deer humps up, walks stiff): Wait at least 3 hours. Liver hits are fatal but slower. The deer will bed quickly and die, but pressure from tracking too soon will push it.
- Gut shot (deer may kick or seem fine): Wait 6–8 hours minimum. Overnight if you can. This is the hardest wait of your hunting life, but it gives the deer time to bed and expire. Pressure on a gut-shot deer sends it into the next county.
- Hit but deer ran with tail up (uncertain hit): Wait 30 minutes, approach carefully, and assess the blood trail before deciding how hard to press.
Reading the blood trail:
Bright red, bubbly blood indicates a lung hit — good sign. Dark red or maroon blood with no bubbles suggests a muscle or liver hit. Green or brown material mixed with blood means a gut hit. Pink watery blood can indicate a lung hit in some cases. Sparse blood on the first 50 yards doesn’t mean a bad hit — some shots bleed internally before blood reaches the exit.
At the last blood:
When the trail goes cold, don’t panic and don’t start thrashing around. Mark the last blood. Then get low and slow. Look for hair, disturbed leaves, hoof prints, or a spot where the deer may have bedded. Do a slow 360-degree search from the last blood before expanding out.
Deer that die quickly often pile up on trails or in thickets just a short distance from the last blood. I’ve found many deer within 30 yards of where the trail went cold, just off the main trail in heavy cover.
If you’re running out of light, mark everything, go get help, and come back in the morning if temperatures allow. It’s okay to ask for another set of eyes on a tough tracking job. That’s not failure — it’s how serious hunters operate.
Field Dressing Basics
I’ll keep this section short because we have a complete field dressing step-by-step guide elsewhere on this site — it covers the whole process in detail with photos.
The short version: get the body cavity open and the guts out as fast as possible after recovery. Heat is the enemy of venison quality. Every minute spent with the guts in is a minute of bacterial activity. In warm weather (anything above 45°F), this is urgent.
The standard field dressing process involves opening the belly cavity from sternum to pelvis, removing the digestive organs, and getting airflow into the chest. Done right, it takes 15–20 minutes. Done wrong, it makes a mess and can taint the meat with gut contents.
The one non-negotiable: don’t cut the bladder or intestines. If you do, rinse thoroughly with clean water. And work with a sharp knife — it’s safer and it does a cleaner job.
Save the heart and liver if you’re going to eat them. They’re exceptional table fare and go to waste on most kills.
Meat Care in the Field
The tag is punched. The deer is on the ground. Now the clock starts.
Most hunters put all their energy into killing the deer and not nearly enough into taking care of the meat afterward. After 25 years of hunting and time spent actually working with carcasses professionally, I’ll tell you: the difference between great venison and gamey, disappointing venison is almost entirely about what happens in the first few hours after the kill.
Temperature is everything. Ideal meat storage is 34–40°F. Above 50°F, bacterial growth accelerates. Above 70°F, you’re fighting a losing battle.
Here’s what happens in a warm fall: you shoot a deer at 4 PM in 65-degree weather. You field dress it, drag it out, throw it in the bed of the truck, and don’t get it to a cooler until 10 PM. That’s six hours in conditions that are too warm. You’ll still have usable meat, but you’ve already compromised quality.
The hide is a heat trap. Get it off as soon as possible in warm conditions. A skinned carcass loses heat much faster than one with the hide on. In cold weather (below 40°F), the hide offers some protection and you have more time — but in most of the whitetail range during early-season hunts, it’s not cold enough to let the hide stay on overnight.
Prop open the body cavity. After field dressing, use a stick or your knife to prop the chest cavity open so air circulates inside. This alone makes a significant difference in how quickly the carcass cools.
Ice and coolers. For warm-weather hunting, I load a large cooler with ice before I leave the house. When the deer is dressed and skinned, I’m breaking it down into quarters and getting those quarters packed on ice within two to three hours of the kill. Quartered and iced, venison will keep for 10–14 days and gives you flexibility for processing.
The backlogs that kill meat quality:
- Leaving the hide on in warm weather
- Not field dressing quickly after recovery
- Piling meat without airflow
- Skipping the pre-cooling step before refrigeration (warm meat fogs a fridge)
If you’re hunting wilderness or backcountry where a cooler isn’t accessible, game bags are essential. Quality breathable cotton or synthetic game bags keep flies out while allowing moisture to evaporate, which is what forms the protective “pellicle” on aged meat. Keep the bagged quarters in shade and hang them if possible — airflow underneath matters.
Ice Tactic for Warm-Weather Hunting
Don’t pack ice directly against meat — it causes freezer burn and surface spoilage. Put ice in gallon zip-lock bags or use block ice in the bottom of the cooler, then lay quarters on top so cold air settles around the meat. Drain water every day and replenish ice as needed.
Aging. Given the option, wet-aged or dry-aged venison is noticeably better than fresh-processed. Seven to fourteen days at 34–38°F breaks down connective tissue, tenderizes muscle, and concentrates flavor. Whole quarters or bone-in cuts age best. If you’re processing at home, take your time. The freezer will wait.
I’ll be straight with you: the hunters who consistently have the best table fare aren’t necessarily the best shots or the best woodsmen. They’re the hunters who treat the animal well from shot to table. It’s a full process, and the back half matters as much as the front.
Putting It Together
Montana 2019 was a good reminder. The shot took three seconds. Everything before it — the June scouting trip, the wind analysis, the three-mile approach in the dark, the decision to wait for a quartering-away angle instead of rushing a frontal shot — took months.
Deer hunting done right is a season-long project. Hunters who kill consistently every year aren’t lucky. They scout harder, they respect the wind, they wait for the right shot, and they take care of the animal once it’s on the ground.
The QDMA (now the National Deer Association) has spent decades documenting what separates successful hunters from unsuccessful ones. The pattern holds everywhere: scouting effort, stand discipline, and shot selectivity. Those three things account for the gap between hunters who tag out every year and hunters who go home empty-handed.
Start with one season where you commit fully to the pre-work. Scout hard in winter and spring. Hang stands early. Run cameras without over-checking them. Then hunt the wind and wait for the right shot.
The deer are out there. They were there last year and the year before. The question is whether you did the work to be in the right place when it matters.
Go do the work.
Recommended Gear
Deer Hunting Gear | Trail Camera for Deer Scouting
Frequently Asked Questions
When is the best time to hunt deer? Early morning and late afternoon are consistently most productive, but during the rut (typically late October through mid-November for whitetails) midday movement spikes dramatically. Weather also matters — a cold front pushing through is almost always worth an all-day sit.
What is the best weapon for deer hunting beginners? A rifle chambered in a proven cartridge like .308 Win or .30-06 gives beginners the most margin for error. Longer effective range and flatter trajectory mean slight errors in form or distance estimation are less punishing than with archery equipment. Start with a rifle, learn the fundamentals, then branch into bow or muzzleloader if you want to.
How far can deer smell a human hunter? Under the right conditions — calm air, deer downwind — whitetails have been documented detecting human scent at over a quarter mile. In practical field situations, assume any deer within 100–200 yards that gets your wind will blow out. Play the wind religiously. No amount of scent spray substitutes for good wind management.
What should I do immediately after shooting a deer? Mark the exact spot where the deer was standing when shot. Note the time. Watch where the deer runs and where you last see it. Wait at least 30 minutes before tracking (longer for marginal hits). Then approach the last known location carefully and look for blood, hair, and tracks before following the trail.
How do you keep deer meat from spoiling in the field? Get the hide off and the body cavity open to airflow as fast as possible. Heat is the enemy — anything above 40°F accelerates bacterial growth. Prop the chest cavity open with a stick, hang the carcass if you can, and get it into a cooler or cold storage within a few hours if temperatures are warm. On cool fall days you have more time, but don’t push it.