This article contains affiliate links. We may earn a small commission if you purchase through these links, at no extra cost to you.
My neighbor Linda has kept bees for eleven years. When I told her I was thinking about getting a hive, she looked at me for a second and then said, “You’re going to love it — and you’re going to get stung in places you didn’t know you had.” She was right on both counts.
I started with two hives three years ago, mostly because our vegetable garden was producing better on the side nearest Linda’s property and my husband joked that we were freeloading off her bees. He wasn’t wrong. Pollination makes an enormous difference in garden yields — some studies show 20-30% higher fruit and vegetable production with adequate bee activity. Our garden backed that up once we had our own hives.
But I won’t pretend I started beekeeping purely for practical reasons. There’s something deeply satisfying about opening a hive and seeing ten thousand tiny organisms working together in this incredibly organized system that’s been functioning for millions of years. It puts your to-do list in perspective. And the honey is the best thing I’ve ever tasted, which doesn’t hurt.
If you’re already raising backyard chickens and growing your own food, bees are the natural next step. They take less daily time than chickens, they improve everything else you’re growing, and they produce a surplus you can eat, sell, or give away. Here’s what you actually need to know.
Table of Contents
- Before You Start: Check Your Situation
- Hive Types: Which One to Pick
- Essential Equipment
- Getting Your Bees
- The First Year: Seasonal Calendar
- Inspections: What You’re Looking For
- Honey Harvest: When and How
- Stings: The Honest Truth
- Common First-Year Mistakes
- What It Actually Costs
Before You Start: Check Your Situation
Local regulations. Most suburban and rural areas allow beekeeping, but some HOAs and municipalities restrict it. Check your local ordinances and HOA rules before you invest. Some areas require registration with the state agriculture department. In our county, I had to register my hives online — took five minutes, no fee.
Space. You need less than you think. A single hive takes up about a 2x3 foot footprint. You need working room around it — roughly a 6x6 foot area so you can stand behind the hive during inspections. The flight path matters more than the footprint. Bees leave the hive and fly upward, so face the entrance toward a fence or hedge and they’ll fly over head height immediately. My hives face a six-foot privacy fence. The bees go up and over. My neighbors on the other side don’t even notice them.
Water source. Bees drink water. A lot of it. If you don’t provide a water source, they’ll find your neighbor’s pool, their dog’s bowl, or their birdbath. This is how you get complaints. Set up a shallow dish with pebbles or corks (so the bees can land without drowning) and keep it filled. A dripping faucet works too. Establish the water source BEFORE you install the bees so they imprint on your water, not the neighbor’s.
Establish Your Water Source First
Set up the bee waterer at least a week before your bees arrive so foragers discover it during their orientation flights. Once bees imprint on a water source — your neighbor’s pool, for instance — they are very difficult to redirect away from it.
Sun exposure. Hives should get morning sun (helps bees warm up and start foraging earlier) and some afternoon shade in hot climates. In northern states, full sun is fine. In the South, afternoon shade keeps the hive from overheating. My hives are on the east side of a large oak — full sun until about 1 PM, then dappled shade.
Allergies. Here’s the serious part. If you or a family member has a known bee sting allergy, talk to an allergist before you start. Anaphylaxis is a medical emergency. Most people who think they’re “allergic to bees” actually just have normal sting reactions (pain, swelling, redness). True systemic allergic reactions — hives all over the body, difficulty breathing, dizziness — affect about 3% of the population. Know which category you’re in.
Know Your Allergy Status Before You Start
If you or anyone in your household has ever had a systemic reaction to a sting — throat tightening, widespread hives, difficulty breathing, or dizziness — consult an allergist before purchasing any bees. Keep an epinephrine auto-injector on hand if you have any history of severe reactions.
Hive Types: Which One to Pick
Three main options. Each has trade-offs.
Langstroth hive — This is the standard. Rectangular boxes stacked vertically, with removable frames inside. The vast majority of beekeepers in North America use Langstroths. Advantages: standardized equipment (everything is interchangeable), most educational resources assume you’re using this type, easy to add space by stacking another box on top. Disadvantages: heavy — a full deep super weighs 60-90 pounds, which matters when you’re lifting boxes during inspections.
Langstroths are what sit in my backyard. Recommendation for beginners is to start here because every book, YouTube video, and mentor will be speaking the same language. When you google “when do I add a second brood box,” the answer assumes Langstroth.
Top-bar hive — Horizontal design. Bars lay across the top of a long trough-shaped hive, and bees build comb hanging from each bar. Advantages: no heavy lifting (you pull out one bar at a time), bees build natural comb without foundation, lower startup cost if you build it yourself. Disadvantages: lower honey yields, comb can break off the bars in hot weather, harder to find mentor support since fewer people use them.
Warre hive — Vertical like a Langstroth but smaller boxes, and you add new boxes to the BOTTOM instead of the top. Designed to mimic a natural tree cavity. More hands-off management philosophy. Disadvantages: harder to inspect (the bottom box is the oldest comb), less standardized, smaller knowledge base.
Go with: Langstroth with medium (6 5/8 inch) boxes instead of deeps. Medium boxes are lighter — about 50 pounds full instead of 80+ — and you can use the same frame size for both brood and honey supers. Less equipment variety to manage. This is what my mentor Linda runs and what I switched to after my first season of wrestling with deeps.
Why Medium Boxes Beat Deeps for Beginners
A full Langstroth deep super weighs up to 90 pounds — that’s a lot to lift over your head during an inspection. Using all-medium boxes keeps the heaviest lift around 50 pounds and lets you use the same frame size for both brood and honey, so you only need to stock one type of equipment.
Essential Equipment
Here’s what you need to start, with real prices.
The hive itself. A complete Langstroth setup includes: bottom board, two brood boxes (medium), frames with foundation, an inner cover, and a telescoping outer cover. Buy unassembled to save money — assembly is straightforward with wood glue and a few nails. A complete starter hive kit runs $150-$200 unassembled, $200-$280 assembled.
Protective gear. A ventilated jacket with attached veil ($40-$70) is the minimum. Full suits ($60-$100) give more coverage. Leather or goatskin beekeeping gloves ($15-$25) with gauntlets that cover your wrists. Some experienced beekeepers ditch the gloves for better dexterity. I still wear mine. Every time.
Smoker. A stainless steel bee smoker ($25-$35). Smoke triggers the bees to gorge on honey (instinctive response to forest fire), which makes them calmer and less defensive. Use pine needles, burlap, or dried leaves as fuel. A few gentle puffs at the entrance before you open the hive makes a massive difference.
Hive tool. A flat metal pry bar designed for separating frames and boxes that the bees have glued together with propolis (a resinous substance they make). About $8-$12. You will use this more than any other tool. Bees glue everything to everything. Every frame, every box, every surface. The hive tool is how you un-glue it.
Bee brush. Soft-bristled brush for gently moving bees off frames during inspections. About $5. Some people just use a turkey feather.
Frame grip (optional but recommended). Spring-loaded clamp that grabs frames so you can pull them straight up without prying. About $10. Makes inspections much smoother, especially when frames are stuck together with propolis and beeswax.
Getting Your Bees
You’ve got a few options for starting your first hive.
Package bees ($120-$170 for a 3-pound package). This is a screened box containing about 10,000 bees and a separately caged queen. You install them into your empty hive. They build comb, the queen starts laying, and you have a functioning colony within a few weeks. Order in January or February for April delivery — packages sell out fast.
Nucleus colony (nuc) ($150-$200). Five frames of established comb with brood (baby bees), honey stores, worker bees, and a mated laying queen. You transfer the frames directly into your hive. The colony is already functioning — the queen is already accepted and laying. This gives you a 4-6 week head start over a package. My strong recommendation for first-time beekeepers. You’re starting with a mini-colony instead of a box of confused bees.
Catching a swarm (free). In spring, established colonies split and half the bees leave with the old queen to find a new home. Swarms cluster on branches, fences, and building overhangs. If you can catch one, you have free bees. Local beekeeping associations often maintain swarm lists — people call when they see a swarm and beekeepers come collect them. The catch: you don’t know the genetics, health history, or temperament. And catching a swarm off a tree branch twenty feet up is more adventure than most beginners want in week one.
My take: Buy a nuc from a local beekeeper. Local bees are adapted to your climate. The beekeeper can answer questions specific to your area. You’re supporting a small operation. And you start with a proven queen who’s already laying, which eliminates the biggest variable in first-year success.
The First Year: Seasonal Calendar
Spring (March-May, depending on your zone). Install your bees. Feed sugar syrup (1:1 ratio of white sugar to water) if they don’t have enough natural forage yet. The colony builds comb, the queen ramps up egg laying, and the population grows rapidly. Check weekly for signs of the queen laying (look for eggs — tiny white grains of rice standing upright in the bottom of cells).
Late spring (May-June). Population is booming. Watch for signs of swarming — queen cells (large peanut-shaped cells hanging from the bottom of frames) mean they’re preparing to split. If you see them and don’t want to lose half your bees, you can split the hive yourself (a topic for another article) or destroy the queen cells. Add a honey super once the brood boxes are 70-80% drawn out with comb.
Summer (June-August). Peak foraging season. The colony should be strong and building honey stores. Add honey supers as needed — when one is 70% full, add another on top. Reduce inspections to every two weeks. The bees know what they’re doing. Check for disease signs (spotty brood pattern, foul smell, deformed wings) but otherwise stay out of their way.
Late summer/Fall (August-October). Varroa mite treatment. This is non-negotiable. Varroa destructor is a parasitic mite that feeds on bee larvae and transmits viruses. Every hive has them. Untreated colonies typically die within 1-2 years. Treatment options include oxalic acid vaporization, formic acid strips, and Apivar strips. Your local bee club can advise on timing and method for your area. Treat in late summer so winter bees (the long-lived bees that carry the colony through winter) are born healthy.
Varroa Treatment Is Non-Negotiable
Every hive carries Varroa destructor mites. Without treatment, most colonies collapse within one to two years. Treat in late summer so the long-lived winter bees — the ones that keep the colony alive until spring — are born free of mite-transmitted viruses. Skipping this step is the single biggest cause of first-year colony loss.
Harvest honey in late summer or early fall. Leave enough for the bees to eat through winter (more on this below).
Fall/Winter (October-March). Reduce the entrance to keep mice out (a simple entrance reducer or piece of hardware cloth). Ensure the hive has adequate food stores — 60-90 pounds of honey depending on your climate (that’s roughly one full medium super). Don’t open the hive when temperatures are below 50 degrees F. In cold climates, some beekeepers wrap hives with insulation or tar paper. I don’t — our Tennessee winters are mild enough. Linda doesn’t either and she’s in the same climate. The bees cluster together and vibrate to generate heat. They’re surprisingly good at surviving cold. Moisture is the bigger winter killer — make sure your inner cover allows moisture to escape upward.
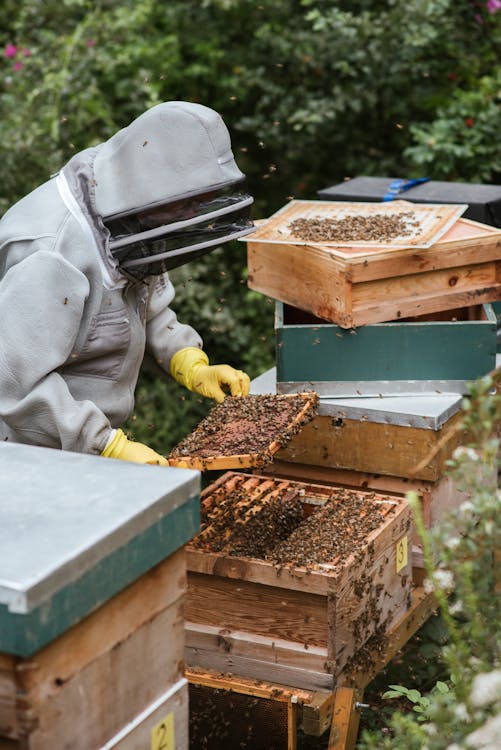
Inspections: What You’re Looking For
During each inspection, you’re checking five things. Takes about 15-20 minutes per hive once you know what you’re looking at.
1. Queen activity. You don’t need to find the queen herself (she’s fast and hides from light). Look for fresh eggs — tiny white dots standing up in the bottom of cells. If you see eggs, the queen was there within the last three days. Good enough.
2. Brood pattern. Healthy brood frames show a solid, compact pattern of capped cells with very few empty ones in between. A “shotgun” pattern — scattered empty cells among capped brood — can indicate disease or a failing queen.
3. Food stores. Frames of capped honey along the outer edges. Frames of pollen (colorful, packed cells) near the brood. If stores look low during a nectar dearth, feed sugar syrup.
4. Disease signs. Sunken or punctured cappings, foul odor, chalky white or black mummies on the bottom board (chalkbrood), deformed wings (varroa virus). If you see anything suspicious, take photos and consult your local bee inspector or beekeeping club. Don’t panic — most issues are treatable if caught early.
5. Space. If eight of ten frames are covered with bees, they need more room. Add a box. A crowded colony is a colony planning to swarm.
Honey Harvest: When and How
First-year colonies often produce little to no surplus honey. They’re building comb from scratch and establishing themselves. Don’t be disappointed if you harvest nothing your first year. The colony needs 60-90 pounds of honey for winter. Everything above that is yours.
Second year and beyond, a healthy colony in a good forage area can produce 30-60 pounds of surplus honey. Some years more, some years less. Weather, forage availability, and colony health all affect yields.
Harvesting process:
-
Remove the honey super from the hive. Shake or brush bees off the frames first. A bee escape board ($15-$20) placed under the super 24 hours before harvest lets bees leave but not return — saves you from fighting thousands of annoyed bees.
-
Uncap the honey. Use a hot uncapping knife ($15-$30) or an uncapping fork to slice off the thin wax cappings covering each cell. Do this over a container to catch the cappings — they’re full of honey too.
-
Extract. A manual honey extractor ($100-$200 for a 2-frame model) spins the frames, flinging honey out via centrifugal force. The frames are undamaged and go back in the hive for the bees to refill. If you don’t want to buy an extractor, many local bee clubs have loaners or extracting days where members share equipment.
-
Strain through a fine mesh strainer to remove wax bits. Let it settle for 24 hours so air bubbles rise to the top. Then bottle.
Crush-and-strain method (no extractor needed): Cut the comb out of the frames, crush it in a bucket, and let gravity strain the honey through cheesecloth or a paint strainer bag. Simpler, but you destroy the comb and the bees have to rebuild it from scratch, which costs them energy and reduces next year’s yield. Fine for your first small harvest.
Fresh raw honey from your own backyard doesn’t taste like store honey. It tastes like your local flowers. It changes character through the season. Spring honey is light and floral. Late summer honey is darker and richer. My kids spread it on toast every morning and have become complete snobs about it. They refer to store honey as “the fake stuff.” They’re not entirely wrong — a lot of commercial honey is ultra-filtered or blended with corn syrup.
Stings: The Honest Truth
You will get stung. Not might. Will. Accepting this up front is better than pretending otherwise.
I get stung maybe 5-8 times per season. Most stings happen during inspections when I accidentally pinch a bee between a frame and the box, or when I move too quickly and one gets defensive. The jacket and gloves prevent most of it, but bees are small and determined and they find gaps.
Pain management: A bee sting hurts for about 1-2 minutes at peak intensity, then fades to a dull ache and localized swelling for 24-48 hours. Remove the stinger immediately by scraping it sideways with a fingernail or credit card — don’t squeeze it, which injects more venom. Ice and antihistamine cream help with swelling.
The weird part: most beekeepers report that sting reactions decrease over time. My first season, stings swelled up dramatically. Now, three years in, a sting gives me a small red dot and mild itching for a few hours. Your body does adapt. The first few are the worst.
With kids: Keep kids away during inspections. A curious 8-year-old peering into an open hive is a recipe for tears. Let them watch from 20+ feet away. My boys help with honey extraction (indoors, controlled environment) and they love the bottling part. They don’t come near the hives when I’m working them.
Common First-Year Mistakes
Not feeding enough in the first year. A new colony installed from a package or nuc is building comb from nothing. That takes enormous energy. Feed 1:1 sugar syrup continuously until they stop taking it or until the fall. Don’t worry about “contaminating” your honey — you won’t harvest surplus honey the first year anyway. The syrup goes into comb building and brood rearing, not stored as honey.
Inspecting too often. Every inspection disrupts the colony. Once a week during active season is plenty. I know a first-year beekeeper who opened his hive every other day because he was excited. His bees got aggressive, stopped building comb efficiently, and he couldn’t figure out why. Every time you open the hive, the bees spend hours resealing it with propolis and returning to normal. Give them space.
Skipping varroa treatment. I hear this one constantly: “I want to be treatment-free.” I respect the philosophy. But for a first-year beekeeper, losing your colony to mites — which is nearly guaranteed without treatment — is heartbreaking and expensive. Treat your bees. Learn the biology. After a few years and some experience, you can explore mite-resistant genetics and integrated pest management. But your first colony? Treat it.
Harvesting too much honey. Greed kills colonies. If you take too much and the bees don’t have enough to eat through winter, they starve. Period. When in doubt, leave more honey and take less. You can always feed sugar syrup in a pinch, but it’s a poor substitute for their own honey stores.
Leaving Too Little Honey for Winter
A colony needs 60-90 pounds of stored honey to survive winter depending on your climate. If you harvest too aggressively in fall and the bees run short in February, there is nothing you can do — the colony starves before you can intervene. Always leave one full medium super untouched as winter reserves.
Not joining a local beekeeping club. This is the single best piece of advice I can give. Local beekeepers know your climate, your forage plants, your pest pressures, and your seasonal timing. A mentor who’s been keeping bees in your area for ten years is worth more than every book and YouTube video combined. Most clubs welcome beginners enthusiastically — beekeepers love talking about bees.
What It Actually Costs
Year one startup for two hives (recommended minimum — one hive gives you no comparison point if something goes wrong):
| Item | Cost |
|---|---|
| 2 complete hive setups (unassembled) | $300-$400 |
| 2 nucs (from local beekeeper) | $300-$400 |
| Ventilated jacket and veil | $50-$70 |
| Gloves | $15-$25 |
| Smoker | $25-$35 |
| Hive tool | $8-$12 |
| Bee brush | $5 |
| Entrance feeders (2) | $10-$15 |
| Sugar for feeding (first season) | $20-$30 |
| Total startup | $733-$992 |
Call it $750-$1,000 for a proper two-hive setup. Not cheap. But consider what you get back.
Ongoing annual costs: Varroa treatment ($15-$30 per hive), sugar for feeding ($20-$30), replacement equipment as needed ($20-$50). Total: maybe $75-$150 per year for two hives.
What you get back: 30-60 pounds of honey per hive per year (starting year two). Raw local honey sells for $10-$15 per pound at farmers markets. Even if you just consume it yourself, that’s $300-$900 worth of honey annually from two hives. Plus beeswax for candles, lip balm, and food wraps. Plus dramatically improved garden pollination. Plus a skill that’s genuinely useful in a self-sufficient lifestyle.
You break even in year two if the bees survive winter. Most first-year colonies do, with proper mite treatment and adequate food stores. After that, it’s pure return.
Three years in, I’ve harvested over 150 pounds of honey, given away enough to make every neighbor on my street a fan of the bees, improved our garden yields noticeably, and picked up a skill that makes me feel capable in a way few things do. The stings are temporary. The satisfaction isn’t.
Start with two hives, a good mentor, and the acceptance that you’re going to make mistakes. The bees are remarkably forgiving of beginner errors as long as you give them space, treat their mites, and leave them enough honey to eat.